How to propagate grapes at home in the fall
One of the main disputes that do not fade in the circles of wine growers is when it is best to propagate grapes - in the fall or in the spring. Both spring and autumn planting have their supporters and opponents. But still, most experienced winegrowers agree that it is better to plant a crop in the fall. Why and how to do this, read on.
Did you know? The high content of glucose and fructose in grape berries makes them a real elixir, necessary for the smooth and full functioning of the brain.
Benefits of Grape Propagation in Autumn
The optimal autumn period for the reproduction of grapes is the time of pruning (October - November, depending on climate conditions). This is best done after the leaves have fallen, often after the first frost. Experienced gardeners argue that it is autumn cuttings that are most suitable for subsequent cultivation.
- More about the advantages of autumn breeding:
- Over the summer, the vine managed to ripen well, and accordingly, cuttings cut in the fall will be strong and healthy.
- In autumn, cuttings are cut from bushes that have accumulated enough nutrients. This suggests that the seedlings grown from them will quickly take root and will have strong immunity.
- In severe winters, the eyes and buds of grapes can suffer from low temperatures, and in spring there will simply be nothing to choose from quality cuttings.
- A vine sheltered for the winter can be damaged by mold and fungal infections and will no longer be suitable for subsequent propagation.
- Grapes can get mechanical damage in winter, which will also negatively affect the quality of cuttings.
- Rooted petioles are more resistant to transport.
- In the fall among market variety, you can purchase cuttings from varieties that you have been looking for for a long time.
- Spring is a period of hassle. All you need to sow, dig, plant, fertilize, and you may not have enough time for proper care of the cuttings, so it is better to do everything in the fall in the quality.
How to propagate grapes with cuttings
Propagation of grapes by cuttings consists of harvesting, storage and rooting of planting material.

Billet
Harvesting of grape cuttings begins with their selection and cutting.
Quality material must meet the following criteria:
- Good maturity and development.
- The correct thickness. The diameter of the cut part should be 6–10 mm. Petioles thicker than these parameters in viticulture are called fattening, and they are most likely not to take root. Also, you can not cut future seedlings, the diameter of which is thinner: they simply will not have the strength to take root.
- Hardness. The vine selected for cutting should be solid, but flexible.
- The color of the bark. The bark of a mature vine is painted in shades of brown. If the bark is green, then the shoot is not ripe.
- The color of the vine on the cut. It should be green, a brown color on the cut indicates that the vine suffered from frost.
- Healthy looking escape. Carefully inspect the vine for stains or damage. If such were found, then this vine is not suitable for cuttings.
- The length of the planting material. Each stalk should have a length of 40-50 cm, and it should have 2-4 eyes, so it is recommended to cut them with a longer length. The fact is that during the winter their tips can rot or dry out, and you will have to remove the damaged parts, that is, the length of the chubuk will be significantly shortened.
Important! If the cuttings are not cut in your vineyard, then carefully inspect them before planting to make sure that they are not infected with a fungus or phylloxera.
Winter storage
To get seedlings from cut chubuki, take care of their good wintering. From their surface, stepsons, mustaches and remaining foliage should be eliminated. Then the petioles must be folded and tied evenly (use a soft wire or rope). Do not forget to stick a label on each bunch, on which the varietal variety will be indicated.
To store future seedlings in winter as follows:
- In the trenches dug in soil. The depth of such "ravines" should be 50 cm, and the length should correspond to the length of the handle; the twigs should not be allowed to bend. You can dig a trench on a hilly place. It is important that groundwater does not lie near the surface. The bottom of the recess should be covered with a ten-centimeter layer of moistened sand, on which the Chubuki are horizontally stacked. From above they are covered with soil (40 cm) and a small warming hill is made of sawdust, straw, peat, dry foliage. With the onset of frost, it is recommended to envelop such a storage with polyethylene film. If you plan to grow seedlings at home, then you should not store chubuki in the ground, since it will take a lot of trouble to find and dig them out in the winter.

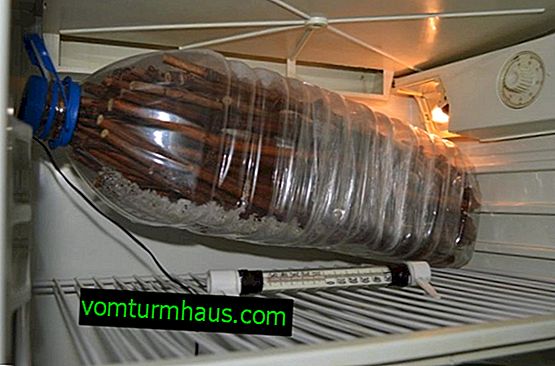
- In the fridge. The best place is the door. Before “settling”, the knit chubucks in the refrigerator should be pre-soaked in water (2 days), placed in a bag of polyethylene and tied, leaving the opportunity to breathe. Experienced growers are advised to envelop the bunches with future seedlings with a damp towel and make sure that it does not dry out. Also, change your towel in a timely manner if an unpleasant odor starts to spread when you open the bag.
- In the basement. Collect wet sawdust in plastic bags and place bundles of petioles on them. Then the package must be tied, but not tight, since the Chubuki must breathe. Watch the moisture of sawdust: if they dry out, moisten.


Rooting grape cuttings
It can be done in soil, water, sawdust. But Chubuki must be prepared for the upcoming landing.
Preparation consists of the following procedures:
- Refreshing cut points with pruning shears.
- Saturation of future seedlings with moisture: petioles are completely immersed in water for 1-2 days. If their bark is wrinkled, you need to immediately remove it. Water needs to be taken well, thawed or filtered. It is also recommended to add growth stimulants to water, for example, “Heteroauxin”, “Epin”, “Zircon”, “Fumar”, “Humate”, “Kornevin”. You can resort to the help of natural stimulants (honey, aloe juice).
- Refreshing cut points for the second time. The bottom cut must be oblique. You also need to make a furrow of the chubuk, that is, apply horizontal incisions to its cortex at a distance of 1 cm from the lower kidney and to the lower edge. This contributes to the rapid emergence of roots.
Important! During storage, the petioles should be protected from drying out, aging, freezing out or damage by fungi. To avoid this, it is worth monitoring the temperature conditions in which they will be stored. The optimum temperature is 0 ... + 5ºС.
In sawdust
It is recommended to start the process in early spring.
The procedure for rooting seedlings is as follows:
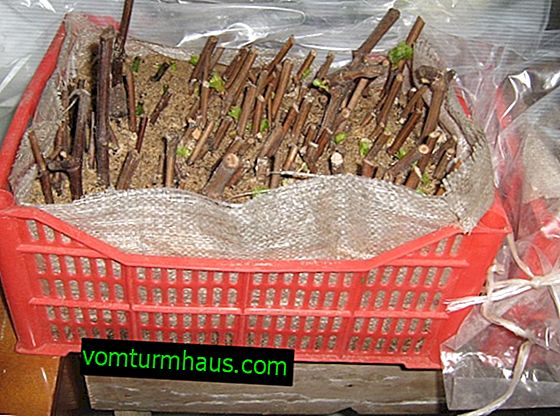
- The lower edge of the properly prepared chubuk should be placed in a container (pot) with steamed and slightly damp sawdust. Every five days, such seedlings need to be watered.
- Pots are placed in a deep container filled with water. The water in the tank must be heated using a water heating tool. The ideal temperature for rooting petioles is + 24ºС.
- Resettlement of the tank with future seedlings and a heater on the windowsill. If you do not have a tool for heating, you can just wait for the seedlings to root, placing it on a warm battery.
Provided that all the features of the cultivation were observed correctly, after three weeks, small roots (about 1.5 cm in length) will appear on your grape seedlings.

In the ground
The optimal time for the procedure is from the beginning to the middle of February. While the cuttings are soaked in water and growth stimulants, you need to prepare the necessary soil mixture. To prepare a high-quality substrate, you need to take the same proportions of garden soil, sawdust made of wood, humus and sand. You also need to stock up with containers - plastic cups or small containers (start from how much free space is on your window sills).
Important! The success of this method will depend on compliance with all growing rules. And the main rule is to keep the top of the chubuk in the cold, and the bottom - in the heat. To do this, they are put on the windowsill. After all, if the foliage appears faster than the roots, then the seedling will dry up, not having the strength to develop the root system.
Next steps:
- Drainage of the bottom of containers with expanded clay or pebbles.
- Filling containers with prepared substrate. It must first be moistened.
- Deepening petioles into the soil. Only the top of the seedling should stick out of the substrate.
- Moisturizing cuttings after planting in the soil.
- Putting containers in a sunny place (windowsill, for example). Make sure that the temperature in which the seedlings are not lower than + 22 ... + 25ºС.
- Topping seedlings 7 days after planting. As a top dressing, use ash from wood or potassium (30 g of fertilizer for one seedling).
- Watering seedlings once a week, using warm filtered water.

In water
In the early spring (end of February - beginning of March), Chubuki must be removed from storage and the process of rooting in water should begin, which is carried out as follows:
- Filling water in glass containers in which rooting will take place. Water must be used distilled or boiled.
- Place the chubuk in a container (water level should reach approximately 4-5 cm). You can not be scared if you see that the incisions placed in the water begin to secrete a colorless jelly-like substance (this will begin almost from the moment it is placed in the water). While such secretions are present, you need to pull the chubuk out of the water several times and rinse the cut from below under a stream of running water so that rot does not appear.
- Daily change of water in tanks. To avoid such frequent changes in water, you can use activated carbon tablets that are thrown into the liquid.
- From the moment of swelling and lightening of the lower cut of petioles, it is necessary to increase the amount of water, raising its level to the second from the bottom of the eye. This swelling indicates the formation of wound tissues that will protect the seedlings from decay and contribute to the appearance of roots.
- Active topping up of water after two weeks, since during this time, the buds of the sleeping buds will begin to bloom, and the seedling will need more moisture.
- The appearance of the roots will begin in about 20-25 days.
- When the root length reaches 3 cm, they must be transplanted immediately into the ground, otherwise the roots will begin to rot due to lack of oxygen.
Video: rooting grape cuttings in water
Planting seedlings in the ground
Experienced growers recommend transplanting seedlings in open ground in mid-May, while several leaves should be present on the seedling.
Important! Do not feed the Chubuki with substances containing nitrogen, as they will contribute to the growth of green mass, and this will adversely affect the formation of the root system.
Transplantation consists of the following steps:
- Site selection in the vineyard. The ideal place is well-lit and well-ventilated, but without drafts. It is also important that the soil on the site is loose, water- and breathable, as well as well-drained.
- Site preparation. The soil on it must be deeply dug and in the process of digging, fertilizers consisting of humus, sand and nitroammophoska should be applied.
- Digging a landing hole, the depth of which should be 20 cm greater than the length of the chubuk. The bottom of the pit is recommended to be drained with sand (a layer about 10 cm thick).
- Putting a seedling in the ground. An eye should remain above the ground at the top of the shoot (it should be 7 cm above the top soil layer). Put two seedlings in one hole, in case one does not take root. If both are rooted, then the one that is weaker needs to be removed. Provided that there is 20 cm distance between the seedlings, you can leave both.

- Tamping the soil around the seedling.
- Abundant watering - about 20 liters of water should be consumed per plant.
- Mulching the soil around the trunk of seedlings. The optimal layer of mulch is 15 cm.

Important! Immediately before planting (mid-May), seedlings must be hardened. The seedlings are kept in the sun (but moderate) for 5 days before lunch, they are hidden in the shade after lunch, then they are again taken out to the sun after 5 pm.
Is it possible to propagate grapes in autumn by layering
Propagation of grapes in autumn by layering is less frequent than by cuttings. But it is possible. As layering, only well-mature shoots that are close to the ground are used. It would also be ideal if the branch that serves as a layering were located in the place where a new bush would form.

Important! The time it takes for the roots to appear can vary depending on the grape variety.
The next year, cuttings will begin to grow, forming new branches, and a year later they will bear fruit. It is possible to completely separate layers from the mother bush after 3 years. The bush, which is formed from the layering in 3 years, has time to grow well, because it receives a double portion of food: from the ground (through the root system) and from the mother bush.

Useful tips for beginners
Experienced growers discover some secrets of propagation of the crop:
- The brown color of the shoot bark does not always indicate its maturity. The color should not only be brown, but also uniform, without the presence of spots. You can make sure that the vine is ripe by bending it: ripened shoots should crack.
- It should be especially vigilant when buying cuttings in the market, especially when it comes to expensive (elite) grape varieties. To purchase a ripe stalk and not spend money empty, check maturity with a 1% iodine solution. The tool needs to lubricate the place of the transverse cut of the handle: mature will acquire a dark purple color, immature - yellow.
- When cutting the cuttings, make sure that the shoots are healthy, there are no internodes uncharacteristic for the variety. Also, the shoot should not have a large core or mechanical damage.
- To slow down the process of evaporation of moisture from the cuttings during storage, you can treat their ends with melted wax or cover with plasticine.
- The advantage of the autumn choice of Chubuk is that at the time of cutting, the plant goes into a dormant state, so it is very important that the cut petioles are not outdoors and warm for more than a day after cutting. This can lead to their awakening.
- Before planting in open ground, only one shoot needs to be left on the seedling, because its rhizome is still too young and it will not be able to feed two shoots.
Learn more about how to propagate grapes with cuttings at home.
As you can see, grapes can be propagated without problems in the fall. Moreover, autumn cultivation has its advantages. The main thing in this matter is the responsibility of the winegrower, because the success of reproduction depends on how he follows the rules for caring for cuttings and layering.


