How to make a do-it-yourself sleigh for a horse
On the market today you can find many different winter carts of all types, types and any design, but their cost is often unreasonably high. Using the simplest drawing or your own ingenuity, you can do the production of sledges for horse harness on your own.
Sleigh structure
A sled for a horse harness consists of many details, but their list depends on the design. The structure of the cart can be anything, given the existing variety and unlimited imagination. The design may include:
- runners;
- undercuts;
- forged staples;
- frame;
- hoofs;
- strips;
- side bends;
- branch cross-members;
- flooring;
- shields;
- transverse flap boards.
Learn how to make a horse blanket, bridle and saddle.
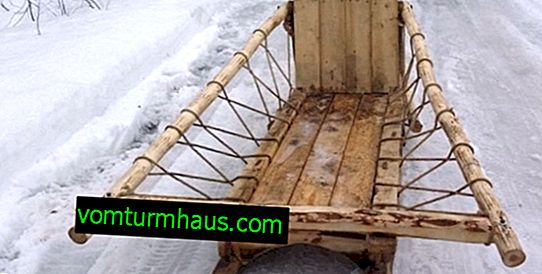
Below is a simple drawing of a sled for a horse harness:

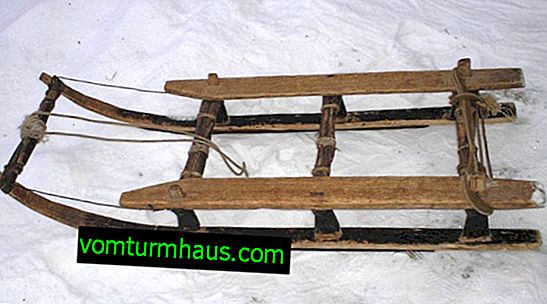
And one more simple scheme of a wooden sled:

Species and their characteristics
From time immemorial, horse sleighs had not only practical application, but also sacred significance among the Slavs, Western European tribes, Finns, and even in Egypt. This vehicle was used by the ancients for funeral rites - the body of the deceased was carried on it. But in Russia they were also used in wedding traditions, as transport to the church.
Did you know? There is a summer version of the sleigh - slicers. You can ride them all year round thanks to special grilles with ice attached to the bottom.
Today there are several types of carts:
- with low runners - stable, but suitable for driving only on already rolled snow;
- with high runners - less stable, but good on bumpy, loose roads;
- sledge - for the transportation of bulky goods, massive, but lightweight at the same time;
- urban - have a small size and provide for transportation of a maximum of two people, the snake is narrow, undercuts are mandatory (metal strips on skids that reduce the roll);

- European hunting - with a brake system (clamps on runners);
- cross - country - with a low back without unnecessary elements;
- firewood - the simplest design without a back;
- Chukhonsky - warmed, wide, tightened on top with dense material.


Popular materials
Previously, wood was the only material for making the sled, but today metal and plastic have been added to it. You can choose any of these three options or combine them at your discretion.
Wood
It is difficult to work with a tree without the appropriate skills. If the lack of experience does not stop you, it is recommended that you still consult with an experienced joiner. For horse sleds, it is best to choose:
- oak;
- elm;
- ash;
- linden;
- bird cherry;
- birch tree.
It is best to bend the bird cherry, and the hardest material is oak, it will have to be evaporated to bend. When choosing a birch, keep in mind that it is the most juicy in the spring.
Important! The tree requires a long preparation. Depending on the technology (soaking, steam baths, boiling), this can take several months.
The tree is easily accessible, it is easier to process it than metal, and the design is quite light, if you do not load it with unnecessary design. In the snow, wooden sledges move smoothly, but do not suffer much pressure and require careful care so that the material does not begin to deteriorate.
Video: making a wooden sleigh
Plastic
Similar to the version with steel, plastic runners are made of plastic pipes. The wagon is lighter than wood and metal, but not suitable for transporting heavy loads. It is advisable to sheathe plastic with metal strips in order to protect the material from possible mechanical damage during travel.
Did you know? In Russia, sleighs were considered an honorable cart even after the invention of the wheel. The departure of the king in a sleigh in the summer for a long time was in the order of things.
Steel
For metal sleds choose carbon or stainless steel. The ride quality does not depend on this choice. Steel is stronger than wood and can withstand heavy weight, but does not tolerate severe frosts. If you need a cart for transporting goods, please note that the skids can burst in the cold.

How to make a sleigh for a horse with your own hands
Reliable exit sleds should have a sufficient gauge and the distance between the runners, given the width of the roads along which you have to move. The best option for the width of the runners is 90 cm for the width of the body - 1.2 m.
Read more about horse gait.
Tools and materials for work
Tools you may need to make horse sledding:
- hammer and nails;
- saw;
- screwdrivers and tape measure;
- jigsaw;
- pipe bender;
- grinder machine;
- welding machine;
- pliers;
- blowtorch;
- drills and drills for wood, metal;
- brushes for painting, varnish.

- wooden boards, parallel bars;
- plywood sheets;
- metal sheets;
- steel tubes;
- metal corners, profile;
- plastic pipes;
- paint for metal or varnish for wood.
Important! Plywood is used only in those places where not a lot of physical activity is planned.
Skid Production
The most difficult and important element of a sled for a horse harness. Today it is most convenient and practical to make them out of steel. Having decided to make steel runners from pipes, they need to be bent from both sides. Bends are made with a special tool - a pipe bender. It greatly simplifies the work and does it quickly.
If there is nowhere to take a pipe bender, the way out of the situation is to fill the pipe with sand and warm it to high temperatures. Heated pipes lend themselves well to physical stress, but do not overdo it. For high-speed sleighs, an additional strip of steel is slightly welded to the runners.

Step-by-step assembly instructions
For each side of a horse-drawn sleigh, 2-3 side racks with a length of about 25 cm are needed. The number of crossbars on a wagon depends on the number of racks, as can be clearly seen in the drawing at the beginning of the article. Assembly sequence:
- Films are made from pipes and welded to runners (if they are steel), length 10-30 cm.
- Racks with crossbars are connected using a welding machine or self-tapping screws.
- On top of the crossbars, a plywood sheet or wide boards are fixed.
- A plywood sheet or several wide boards is attached to the crossbars.
- Where you have the shafts attached, the cross bar must be bolted or welded, and in it there are loops and hooks.
- Joints and seams are ground.
- If desired, the back is cut out and attached.
- The finished wagon is varnished or painted.
You will also be interested to know at what average speed the horse runs.
Parts that do not carry physical activity should be lightened.
How to harness a horse
Your safety will depend on the correct tightening of the harness. The slightest mistake can cause the wagon to tip over. Stages of horse sledding in a sled:
- Put a rein on the animal’s head.
- Warm up in the hands of a bit, so that the horse does not feel pain from cold metal.
- Throw a harness while adjusting the saddle's position.
- Align, correct the bands if they are twisted.
- Tighten the girth, making sure that it does not squeeze the belly of the animal.
- Pass the clamp over the head and lead the horse between the shafts.
- Fasten the arc and the shafts with loops.
- Check arc fastening.
- Tighten the soup, secure the reins.