How to make do-it-yourself broiler cages at home
Most breeds of chickens need free space and the possibility of walking in the fresh air to maintain health and active development, so the content in the cells is not suitable for them. Broilers in this regard are an exception to the rule. Throughout their short lives, chickens must gain weight intensively, and the restriction of freedom of movement only contributes to this. Many subtleties for growing this bird will be highlighted in this article.
Design features
The fundamental difference between the cage for broilers is determined by the very concept of this variety of chickens and its purpose. Thus, unlike laying hens, which are also often kept in a cellular way, broiler chickens require much less free space, tolerate crowding more easily due to their natural phlegmatic nature, and therefore the size of the cells can be significantly smaller.
Important! It is customary to call a broiler a hybrid of a pet (not necessarily chicken or even not necessarily a bird), which grows very quickly and gains weight, is bred exclusively for meat and slaughtered at a young age. The etymology of the word is associated with the English "broil" - fried meat.
In addition, their life expectancy is very short - only two to three months, after which the chickens are sent for slaughter, so there will be no additional costs for arranging nests and egg traps.

pros
- significant space savings. On the same space the cells can be arranged in tiers, which immediately increases the number of birds placed on the same territory several times;
- ease of maintenance and labor saving on the organization of the process. If you position the structure correctly and foresee all the necessary requirements in advance, the feed and water will be fed into the cages automatically, and instead of cleaning the house, it will be enough just to periodically clean the pallets;
- lower risk of developing infectious diseases. This is due to the lack of contact of the bird with its own droppings and the use of clean food. The feeder cages located on the outside do not allow the chicken to climb into the feed;
- the ability to contain birds of different species in one room, avoiding contact (unwanted mating, conflicts, etc.) between them;
- saving on feed (due to the limited possibility of scattering and pulling them over the entire area of the house). Some poultry farmers even allow themselves to collect grain mixtures or compound feeds that have spilled out of the feeders onto the floor and re-place them in the tray;
- tangible difference in energy consumption (the amount of light consumed, heat, air ventilation). One individual of all this requires much less due to the fact that in the same space contains more birds;
- faster mass gain of chickens, as they lead a sedentary lifestyle;
- ease of bird retrieval for slaughter. No need to chase chickens (in a limited space they are much more affordable).
Did you know? The fact that the broiler gained the necessary mass can be concluded without using weights. To do this, just take the chicken in your hands and blow the feathers on his chest. An indicator of the “readiness” of a bird for slaughter is the fat that shines through the skin, which has a yellowish tint.
Minuses
- increased risk of the spread of infectious diseases due to high crowding of birds. The lack of contact with the environment, other animals, including pests, makes the cell relatively safe. But this feature also has a flip side: if the causative agent of the disease nevertheless affected one individual, then with a high degree of probability the infection will soon spread to all inhabitants;
- increased risk of arthritis and other leg diseases in chickens forced to walk around the net;
- higher requirements for observing temperature conditions, lighting and humidity, especially in the absence of litter in the cells. In addition, in a large room, the bird has the opportunity to find a more comfortable place for itself (for example, where it is warmer, there is no draft). In a cell, an individual is much more dependent on given conditions;
- additional costs for the purchase of equipment or materials for its independent manufacture (in the latter case, difficulties with the construction of the structure and its installation);
- lower taste of meat.

Important! It has been observed that poultry kept on the outside have more tender meat than their relatives of the same breed, age and mass, which were reared in confined spaces.
Chicken coop requirements
When planning to breed broilers, it should be borne in mind that these chickens have very weak immunity compared to their other relatives. Find out also

It is also important to carefully monitor the balanced nutrition of birds and their state of health, since a problem that is not noticed on time can lead to a significant reduction and even complete loss of the entire herd.
Dimensions
The optimal cage sizes for broilers are designed so that the design is as rigid as possible, but at the same time the chickens have the ability to at least some movement inside. The balance between the first and second requirements is shown in the table:
| Height (floor to ceiling) : | 300 - 600 mm |
| Length | 500-1200 mm |
| Width | 200 mm |
| Pallet depth | 200 mm |
| Height from floor to first tier | 350 - 700 mm |
| The distance between the cells in the tier | 35 - 60 mm |
Important! The main parameter by which a cell is selected for a certain number of its cloisters is the length. All other indicators may remain unchanged. For example, for five heads and less, 500 mm is enough, for six to eight chickens - 700 mm, and for a dozen, no less than a meter is needed.
Lighting
As you know, lighting plays a very important role in the maintenance of chickens. But if for laying hens artificial prolongation of daylight is necessary to increase egg production, then broilers are much easier. In the dark, chickens do not eat, and for the fastest possible gain in live weight, they need to be fed as often as possible. For this reason, illumination in the room where the cells are installed should be carried out all year round, so that you can’t do without additional equipment (large windows over the entire wall are not enough).

- when using ordinary incandescent lamps - 100 watts;
- when using LED lamps - 12 watts.
Important! Fluorescent lamps can significantly save energy costs, but they are not suitable for lighting a room where broilers are kept. The flickering light from such devices irritates the psyche of chickens, which is why they gain weight much worse and can even become ill.
As for the lighting mode, there are no upper limits on this indicator: if it is possible to leave light in the house around the clock, this should be done. However, such wastefulness is affordable for not every owner, therefore, the following parameters are considered extremely permissible for the chickens to gain good weight:
| Bird Age in Days | The minimum number of "bright" hours during the day |
| 1-2 | 24 |
| 3-7 | 23 |
| 8 and older | eighteen |
To properly configure the lighting mode, it is better to purchase a special timer. This automates the process and avoids errors due to the influence of the human factor.

Temperature and humidity
If the chickens freeze, they will certainly fall ill and stop gaining weight.
Important! Below +20 ºС, the temperature in the room where the cages with broilers are installed should not fall, day or night. The maximum allowable threshold that birds can withstand is +32 ºС.
The favorable temperature regime for broilers also changes with the growth of chickens. Recommended indicators are as follows:
| Bird Age in Days | Room temperature |
| one | +32 ºС |
| 2 | +30 ºС |
| 3 | +28 ºС |
| four | +27 ºС |
| 5 | +26 ºС |
| 6-11 | +24 ºС |
| 12 and older | +22 ºС |

Did you know? When growing mature hens, businessmen often use “forbidden methods” in the form of antibiotics and growth hormones. There are many dubious tricks in the arsenal of dishonest sellers (pumping a carcass with water to increase weight, processing with chemicals to eliminate stale odor). In order not to become a victim of scammers, you should know that a high-quality chicken carcass must have a rounded breast, its meat is dry and pale pink, the bones do not bulge out, and the fat is always yellow (in no case gray).
Finally, another parameter that must be observed is ventilation. Broilers are very sensitive to drafts. But the stagnation of air in the room, where there is a constant evaporation of the vapor of manure and urine, is an excellent environment for the propagation of dangerous microflora. Therefore, the air exchange should be approximately six cubic meters of fresh air per hour based on 1 kg of live weight of birds. Modern ventilation systems allow you to adjust this parameter very accurately. They are not cheap, but in large farms such costs cannot be dispensed with.
How to make do-it-yourself broiler cages
Since the design of the cage for broiler chickens is quite simple, you can build it yourself if you wish. It will take very little time and effort to do this, especially if you prepare the drawing in advance and strictly follow it. Detailed instructions are outlined below.
Video: DIY broiler cages
Materials and tools for work
Before you begin, you need to prepare everything you need. From the materials you will need:
- wooden mounting rails - boards or beams (you can use the remnants of the building material available on the farm) with a section of 20 mm X 40 mm or 40 mm X 60 mm for the frame;
- metal corners for rigidity;
- metal mesh (chrome or galvanized) with a mesh size of about 2 cm (length and height) for lining;
- sheets of plywood, particleboard or OSB;
- tin sheets for the manufacture of pallets;
- electrodes or metal rods for the front wall;
- PVC sewer pipe or another plastic pipe for feeders and drinkers (for feeders - about 110-150 mm in cross section, thinner can be used for drinkers);
- nipples for drinking bowls;
- adapter and clamp for connecting the drinker to the hose;
- plugs of the appropriate size for the return end of the pipes;
- drop catchers
- mounts for installing feeders and drinking bowls;
- sealant (it is best to use food grade silicone);
- connecting parts: nails, screws, wood screws, furniture confirmates (for rigid fastening of the grid, screws must be with hats).
Did you know? Broiler meat is best suited for frying, baking and cooking minced meat (meatballs, meatballs, meatballs, souffle). But for the broth, good housewives recommend using an adult bird of large sizes.
The working tool kit includes:
- jigsaw or hacksaw for working with wooden and plywood parts;
- files with large teeth;
- metal scissors for cutting mesh;
- electric drill or screwdriver,
- drill;
- hammer;
- pliers or pliers;
- tape measure or other measuring tool;
- level;
- goniometer;
- felt-tip pen or soft pencil for marking.

Manufacturing steps
The following describes how to proceed with the manufacture of the structure:
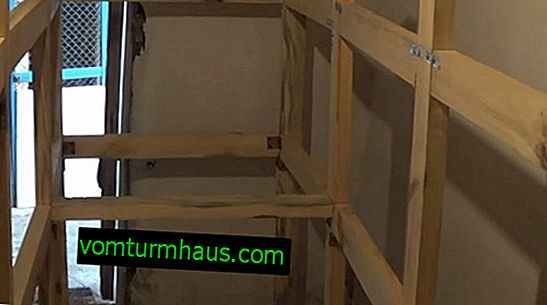
- Before starting work, perform the drawing: outline the size of the cell based on the number of future "residents". The approximate height of the structure should be 120 cm, of which 70 cm will fall on the cage itself and 50 cm on the excrement pan.
- Guided by the plan, cut the required number of wooden battens of a given length under the frame.
- Assemble the frame using self-tapping screws or confirmates (when using nails, you must carefully ensure that their sharp ends do not stick out of the tree, since the bird can get hurt about them).

- Fix metal corners at the joints to increase the rigidity of the structure and protect it from distortions.
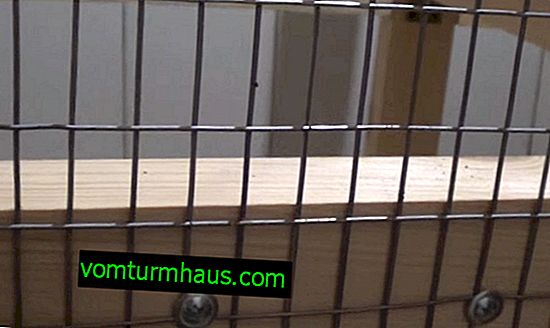
- When the frame is ready, you can start cutting the mesh. If the cutting is done correctly, and there is sufficient skill in such work, you can do this work at the preparatory stage. However, any mistake in the assembly of the frame will lead to the fact that the details of the grid will be larger or smaller than the actual size of the wall. The grid should be cut so that on each side on which it will be attached, it can be installed "overlap". This will provide a more stable design and prevent injury to the bird trying to stick its head or other part of the body into the gap formed between the net and the frame.
- Attach the mesh to the back of the cage with self-tapping screws. It is important that it is well stretched and is not going to fold anywhere.
- Similarly set the grid to the bottom. At the junction with the base of the frame, cut corners along the width of the bar in the grid so that the bottom lies evenly.
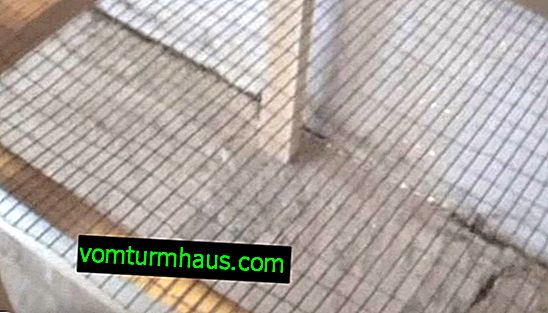
- Bend the ends of the grid rods sticking out on the sides with pliers.

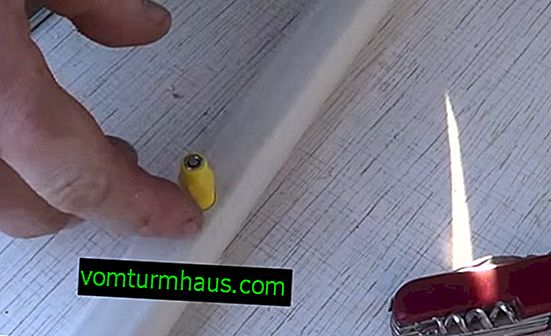
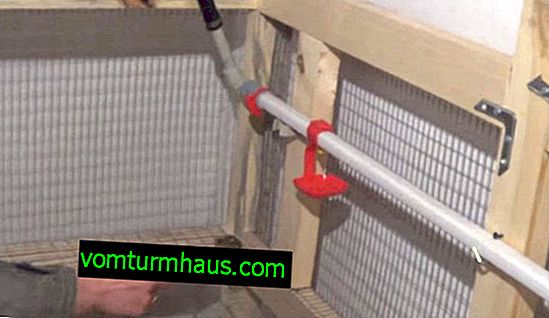
- Cut a plastic pipe of the required size for the drinker (it should correspond to the length of the cage with a small gap for water supply).

- Use a felt-tip pen to mark the places under the nipples on the pipe.
- Drill the necessary holes according to the marking and screw the nipples into them, having previously processed the thread with sealant.
- Using an adapter, a clamp and a fragment of a plastic pipe, connect the future drinker to a hose connected to the water supply, close the other end of the pipe with a plug.

- Install drip catchers.
- Lock the drinker inside the cage.
- Fasten the mesh to the side walls.
- As the front wall, use not rods, but metal rods. Having drilled holes in the upper and lower part of the frame (through holes) at a distance of about 3-4 cm from each other, insert a rod into each pair of holes (in the upper and lower). If it is necessary to remove the chicken, it will be enough to pull out the required number of rods, so it is not necessary to make a special door in the cage.
- Cut the sewer pipe into two parts along the entire length to get a kind of gutter. This is almost a ready-made feeder.

- Fix the half of the pipe along the front wall of the cage so that it is approximately at the level of the breast of the chickens. Install plugs on both sides to prevent food from spilling out.
- From tin or plywood, make a pallet and install it under the bottom.
- From above, it is enough to simply cover the cage with a sheet of plywood. It is undesirable to leave it open, as excessively active chickens can fly over the wall. The work is completed.


Did you know? The most high-calorie part of the chicken carcass is the wings, drumstick and thigh. Least calories in breast.
How to equip cells
The above diagram provides everything that is needed to maintain broilers. However, you can pay a little more attention to arranging the design.
Litter and protection against rodents
When keeping a large herd, the litter in the cells is usually not used. Instead of it (as described in the above example), the floor is made from a grate, and a mobile pallet is installed under it, into which the waste products of birds drain and pour. This system is quite hygienic, simple, economical and does not require additional efforts when cleaning the cage and changing the litter. On the other hand, the absence of insulation under the legs makes chickens more vulnerable to colds and other infectious diseases, as well as the development of arthritis.

Important! Проведенные исследования показывают, что в опилках скапливается меньше влаги и образуется меньшее количество патогенных микроорганизмов по сравнению с соломой. Однако они не должны быть слишком мелкими, иначе могут попасть в дыхательные пути цыплят (а это очень опасно).
В противном случае риск развития инфекционных заболеваний у поголовья становится намного выше, чем в случае полного отсутствия подстилки. Кроме того, скапливающиеся в помещении пары аммиака, который выделяется при испарении помёта, также пагубно сказываются на здоровье молодняка. Чтобы цыплят не тревожили грызуны, помещение, в котором устанавливаются клеточные ряды, должно быть хорошо изолированным. Эта мера в любом случае необходима, поскольку сквозняк может причинить некрепкому здоровью птицы ещё больше вреда, чем случайно забравшаяся в курятник мышь.

Did you know? Мировой рекорд по количеству пойманных грызунов принадлежит кошке по кличке Тоузер, жившей в Британии. На счету у этой охотницы без малого двадцать девять тысяч мышей.
Достаточно высокой гарантией защиты от грызунов является высокое размещение клеток. Однако важно, чтобы с напольным покрытием не соприкасался также лоток для испражнений. Некоторые хозяева рекомендуют засыпать место под клетками битым стеклом, чтобы мышь или крыса не могла даже приблизиться к конструкции, однако такие радикальные меры могут стать причиной травм у обслуживающих клетки людей, поэтому прибегать к подобным крайностям вряд ли целесообразно.
Установка кормушек и поилок
Кормушек и поилок существует множество, однако в отношении бройлеров, содержащихся в клетке, их выбор не так уж велик. Лучшим вариантом поилки является ниппельная система, предотвращающая расплёскивание воды и намокание подстилки. Один из примеров такой самодельной конструкции изложен в описанной выше инструкции. Что касается кормушек, то вместо обычных лотков или желобов специалисты рекомендуют использовать бункерные или автоматические виды, в которых зерновая смесь поступает на кормовую площадку по мере её опорожнения.

Important! Отличительной особенностью бройлеров является очень плохая, по сравнению с другими курами, способность ориентироваться в пространстве. Поэтому корм и вода в клетке должны находиться на видном месте, которое птице не нужно будет искать.
Одному цыплёнку необходимо обеспечить:
- от 60 до 100 мм у кормушки (в зависимости от возраста);
- от 15 до 20 мм у поилки.
Useful Tips
Правильно организовать выращивание бройлеров клеточным способом и избежать наиболее часто допускаемых ошибок помогу следующие советы:
- Кормушки и тем более поилки не следует ставить прямо на пол клетки, это приведёт к существенному увеличению расходов корма и повышению заболеваемости. Лучше всего устанавливать кормушки на внешней стенке, чтобы цыплята могли есть, просовывая голову между прутьями. Очень важно рассчитать расстояние между прутьями правильно, иначе голова цыплёнка может застрять.
- После каждой смены поголовья клетку нужно не только тщательно чистить, но и дезинфицировать.
- Хорошее качество мяса у бройлеров определяется не только правильным содержанием, но и сбалансированным питанием. Птицу нельзя кормить однообразно, а процентное соотношение питательных веществ в рационе должно быть рассчитано предельно точно. В условиях ограниченного пространства это требование приобретает особое значение, поскольку повышенное содержание белков и жиров в корме может привести к ожирению цыплят, а это пагубно скажется на потребительских свойствах мяса.
- Если, помимо сухого корма, в рационе присутствует мокрый (каши и мешанки), для него следует предусмотреть отдельные кормушки, которые необходимо снимать и мыть после каждого использования.
- Вода в поилках не должна быть холодной (её температура её — в диапазоне от 22 до 25 ºС). Отстоянная вода предпочтительнее обычной водопроводной.
- При строительстве клетки для пола лучше предусмотреть сетку с более мелкой ячейкой, чем для стенок (это уменьшит нагрузку на ноги цыплят и понизит вероятность развития артритов и дерматитов на лапах).

Чертежи клеток на разное количество голов
Размеры клеток зависят от количества особей в стаде. В промышленных целях выпускается продукция трёх разных типоразмеров: на десять, двадцать и тридцать особей. Если птиц больше, лучше использовать так называемый батарейный способ содержания, который предполагает установку клеток стандартного размера ярусами или рядами по несколько штук, поскольку закрывать в одном помещении более трёх десятков цыплят неудобно и просто опасно.
Important! При выборе подходящего размера конструкции следует исходить из стандартной санитарной нормы содержания бройлеров, согласно которой на одном квадратном метре должно находиться не более десяти цыплят.
Кроме того, чем меньше длина «помещения», тем проще обеспечить её жёсткость (в то время как слишком длинная конструкция гораздо менее устойчива и прочна). То же касается днища: по мере роста бройлерные цыплята быстро набирают вес, вследствие чего слишком большая по площади сетка под ними начнёт проседать.
Исходя из этого, клетку на 10 голов можно изготовить по следующему чертежу:


Узнайте почему бройлеры падают на ноги и что при этом нужно делать.
Если на подготовительном этапе организовать процесс с соблюдением всех санитарных и технических требований, дальнейший уход за поголовьем не доставит больших хлопот. С другой стороны, игнорирование хотя бы одного условия может привести к гибели стада, поэтому для небольшого поголовья птиц более оптимальным является загонный тип выращивания.


