How to heat a polycarbonate greenhouse in winter?
To get a good harvest of greenhouse crops in the cold season, even a very high-quality polycarbonate greenhouse should be equipped with a heating system. There are many heating options that differ in type of fuel, cost, design and other parameters. Let's take a closer look at all these nuances and find out whether it is possible to build a greenhouse heating system on our own.
Polycarbonate winter greenhouse design
An ordinary polycarbonate greenhouse consists of a foundation (monolithic tape), a supporting frame (wooden beams, plastic or metal pipes) and a covering material (polycarbonate sheets).
Although polycarbonate retains heat much better than glass and plastic film, the greenhouse with this covering material in winter needs additional heating. However, with appropriate insulation of the structure during the construction process, the cost of additional heating will be much less.

Greenhouse insulation from cold winds
In order to protect the structure from cold winter winds, you must initially choose the right location. The most suitable area is open to sunlight, where one side of the greenhouse is closer to a building or the greenhouse is located between two stationary walls located at some distance from it and not blocking sunlight.
In addition, polycarbonate with a thickness of at least 10 mm should be used for the construction of a winter greenhouse. If thinner sheets are available, you can stack them in two layers.
Be sure to take care of the tightness of the joints of the structure. The gaps between the frame and the covering material, as well as between the frame and the foundation, should be protected with roofing material or waterproofing. Did you know? The first greenhouses in the Russian Empire appeared during the time of Tsar Peter I. He ordered the construction of the so-called “Pharmaceutical Garden” in St. Petersburg, where numerous medicinal herbs and exotic plant species brought from distant lands grew. Joints can also be treated with sealants, and it is better to choose those that form a plastic structure, since solid sealants under the influence of sudden temperature changes can begin to crumble.
To seal the gaps between the metal frame and the foundation, rubberized gaskets can be used.
Foundation insulation
The foundation is the foundation of the entire structure and significantly affects the heat inside the greenhouse. And although some farmers place polycarbonate greenhouses directly on the ground, it is better to build a reliable insulated base for effective heat conservation.
The most popular basics of greenhouses:
- concrete strip with foam insulation;
- bars of large section.
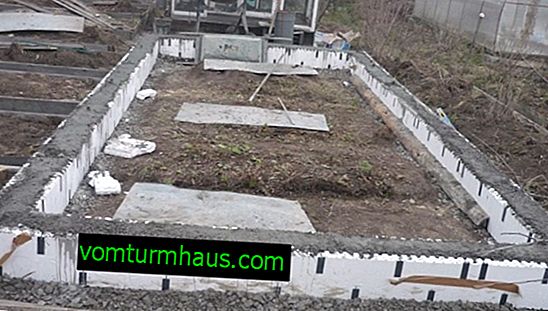

During the construction of the concrete foundation, a gravel-sand cushion should be created in the pit, which will serve as an insulation layer. A good option would be filling the layers with a waterproofing film laid on the bottom and walls of the trench.
The resulting foundation is covered with roofing material, foam is placed around the inside and sand is poured, which additionally protects the structure from low temperatures and moisture.
Ground insulation
The simplest and most effective method of warming the soil is raising plant beds. To do this, raise the soil and place foam or similar material under it so that the beds are about 40 cm higher. In addition to ordinary beds, greenhouse plants can be planted in drawers and placed on shelves.
Read more about how to heat the soil in a greenhouse.
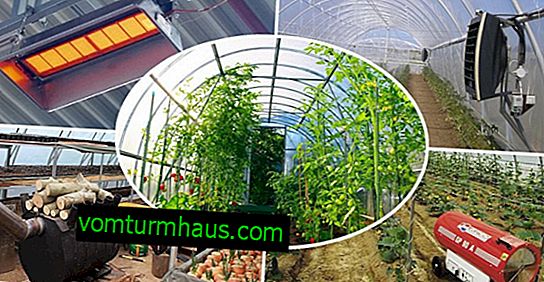
Types of heating polycarbonate greenhouses in winter
In order to choose how to heat the greenhouse, in addition to financial opportunities, it is necessary to take into account the climatic conditions of the area, the size of the room and the type of crops grown. Cold-resistant plants, such as spinach, dill or celery, require minimal heating, and thermophilic tomatoes, cucumbers and peppers need a higher temperature and constant heating of the greenhouse.
Stove
The basis of furnace heating is a solid fuel stove or boiler, working on coal, wood or briquettes. Furnace combustion products harmful to crops are discharged through a chimney that exits.
- Advantages of stove heating:
- inexpensive energy materials;
- simple device and operation;
- fast heating of the room;
- the opportunity to make yourself.
- Disadvantages:
- the need for frequent fueling;
- lack of process automation;
- uneven heating of the room;
- decrease in humidity of air and soil.
In the absence of a humidification system for the greenhouse, to prevent drying out of plants, a wide tank with water can be placed.
Important! For safety reasons, it is necessary to constantly monitor the normal operation of the chimney and periodically clean its internal surfaces of solid particles that have settled on the burnt fuel.
Potbelly stove
One of the simplest designs has a fairly common solid fuel furnace - a potbelly stove. It consists of an ash pan and a closed combustion chamber and is a standard metal furnace equipped with a direct chimney.

Video: Heating a greenhouse with a potbelly stove
Brick oven
A brick stove is a fairly voluminous structure, capable of providing a gradual and uniform heating of the room. Its dimensions and design are taken depending on the heated area. One of the undoubted advantages of a brick oven is a long cooling time - up to a day.
The furnace is arranged as follows:
- location - at the north wall of the room;
- the basis of the furnace is strong, eliminating tilting or tipping over;
- distance to polycarbonate - no closer than 50 cm;
- chimney material - heat-insulated pipe.


Buleryan furnace
An advanced type of potbelly stove equipped with hollow pipes through which air continuously moves during the combustion of fuel is a buleryan furnace.
Compared to a standard potbelly stove, such a furnace heats the entire area of the greenhouse more uniformly and does not burn the beds.

Water
Such heating is usually used in places with harsh climatic conditions and an outdoor air temperature of -40 ...- 50 ° C, when you need to pay special attention to the microclimate of the greenhouse and, accordingly, more complex solutions are needed.
For water heating, a solid fuel, gas or electricity boiler is required, as well as a closed piping system with circulating heated fluid. During operation, the liquid in pipes placed underground or indoors gives off its heat, after which it is again heated by the boiler.
- Advantages of this type of heating:
- safety and usability;
- the ability to maintain a constant temperature;
- lack of "drying" of greenhouse air.
- Disadvantages:
- do-it-yourself device complexity;
- quite tangible material costs.

In this case, it is better to use not water, but a special non-freezing antifreeze. And as the material of pipes for laying under the soil, it is better to choose plastic products - lightweight, inexpensive and resistant to corrosion.
Important! Since condensation does not form on the polycarbonate, all excess moisture during the operation of the heating system will additionally moisten the soil.
Electric
Electricity is a rather expensive source of energy, so it is usually used if it is not possible to use cheaper heating. As a rule, electrical systems are arranged where moderate temperatures are noted with rare drops below -20 ° C.
Electricity is used for water, air or infrared heating. In the first case, an electric boiler is installed to heat the liquid circulating through pipes laid in the ground or along the greenhouse. The layout of the pipes depends on the climate of the region, the heated area and the type of plants.
For the most expensive - air heating - heat guns are used that pump warm air in the room.

The third method is the most economical. Infrared heaters are placed on the ceiling of the greenhouse and sent to the plants, without wasting energy to heat all the air in the room. This type of heating is similar to sunlight and safe for greenhouse crops. Lamps are installed in predetermined zones and create their own microclimate for each type of plant.
Biological
If the greenhouse is located in a temperate-warm climatic region, then its heating can be provided in the most economical way - warm beds with biofuel. We recommend learning how to make a boiler for heating the greenhouse with your own hands. To do this, use a mixture of horse manure and chopped straw, which extends the decomposition period, or compost from household waste. Under the influence of various microorganisms, organic components begin to decompose with the release of heat.
There are also multicomponent warm beds. To build them, you need to make trenches with a depth of about 60 cm and enclose them with walls of slate, brick or boards. A drainage layer (stones or expanded clay) should be laid at the bottom, then a layer of wood pieces, filling the space between them with bark, sawdust and small branches.

Next, you need to put a layer of manure or compost, pour it with water with bio-bacteria and close the bed with cardboard or paper in several layers. The next layer, 30 cm thick, is a mixture of mowed grass, dry leaves and weeds. After that, you can fill the beds with soil mixture to the top, level, pour warm water and cover with a film for 5-7 days. After a while, the organic matter will begin to decompose actively, and the bed will release heat.
In case of short-term frosts, a backup heating system can be provided by laying an electric cable in the pipe along the beds or by installing a fan heater with a thermostat.
Did you know? The largest greenhouse in the world is Britain. The construction consists of two adjacent domed rooms, where more than a thousand species of plants from around the world grow - from tropical to Mediterranean.
How to make DIY heating in a polycarbonate greenhouse
Despite the apparent complexity, you can build a greenhouse heating system yourself without the help of professionals. It is only necessary to carefully prepare and stock up on the necessary tools and materials.
How to make a brick oven
The device for furnace heating is not particularly difficult, almost any owner of a greenhouse will cope with its device.
Necessary materials:
- solid ceramic brick - 220 pcs.;
- fireclay brick - 80 pcs.;
- clay masonry mortar - 80 l;
- chamotte masonry mortar - 30 l;
- foundation concrete - 0.25 m³;
- waterproofing material;
- fire door;
- cast iron grate for grate;
- blowing and cleaning;
- smoke damper.
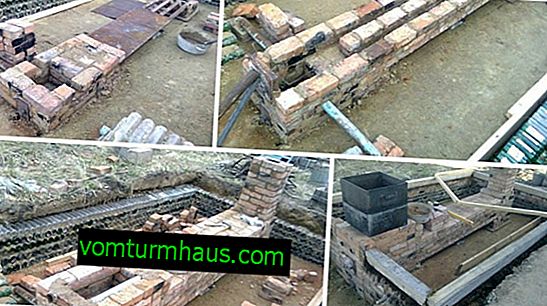

Step-by-step instruction:
- The foundation for the slab is arranged: height - 20-30 cm, size of the base - 70 × 100 cm. For this, a trench is laid with a depth of about 45 cm.
- Formwork is laid along the perimeter of the trench, reinforcement is installed, concrete is poured.
- The area of the base is covered with a sand layer 20 cm thick.
- To create a furnace for laying and an ash pan for waste removal with red brick, 4 initial rows of the structure are laid out on clay mortar.
- A cast-iron ash pan door is installed.
- Rows 5–12 are laid out with fireclay bricks with a fire resistant grip. In the 5th row, the grate is arranged, rows 6–8 are equipped with a furnace door. Rows 9–12 form the combustion chamber arch.
- Refractory bricks are laid out in rows 13–22. The combustion chamber arch is blocked by rows 13 and 14, in the 15th row a cleaning door is mounted.
- The chimney channel is rows 17–21. The first smoke damper is arranged in row 22.
- Rows 23–27 - continuation of the smoke channel. The narrowing of the channel starts from the 28th row, and in the 29th one more smoke damper is mounted.
- The furnace vault is rows 30 and 31. Starting from the next row, a smoke exhaust pipe is arranged. It is created with a dressing and is built of 4 bricks.
Read also how to make a lamp for a polycarbonate greenhouse.
Water Heated Furnace
Despite its cost, water heating has many advantages. It is convenient in operation, makes it easy to maintain the specified temperature and operates on any combustible material - gas, gasoline, biofuels, peat, garbage, etc., which allows you to choose the type of fuel with suitable rates.
Video: DIY greenhouse water heating
Necessary equipment and materials:
- gas or electricity boiler;
- two radiators;
- expansion tank;
- metal pipes;
- chimney;
- temperature regulator.
- Lay pipes in the ground: laying depth - 40-60 cm, pitch between axes - 30 cm.
- Lay the second contour of the pipes - along the beds of the greenhouse. The distance between the outer pipes is 1–1.5 m.
- Place radiators and thermostat.
- Set up a foundation for a steel or asbestos cement boiler.
- At the highest point in the greenhouse next to the boiler, install an expansion tank.
- Equip the system with a manometer and shutoff valve.
- Bring the chimney out, isolate the joints.
Important! Since during heating, water is first sent to the expansion tank, and from it diverges throughout the heating system, all pipes are mounted with an inclination.
How to make heating in a greenhouse economical
Probably the majority of summer residents and farmers are faced with the need to reduce the cost of maintaining a greenhouse, because it often takes from 40 to 80% of the total costs to heat it.
To make heating in the greenhouse economical, you should:
- Correctly choose the place of installation of the structure - open to the sun, but protected from the winds.
- Attach the greenhouse with the north side to the house, which will reduce heat loss and facilitate the connection of all communications.
- Get the maximum amount of winter sunshine will allow the placement of the greenhouse ends from east to west.
- During construction, provide protection against heat loss - a quality foundation, insulation of joints, a polycarbonate layer of at least 10 mm.
- Place the trays at a slope to the south, which will give up to 30% more sunlight.
- Arrange a thermos greenhouse, that is, partially immersed in the ground, which will significantly reduce heat loss.
- Choose a heating method depending on climatic conditions, the size of the greenhouse and the type of crop.
- If possible, use cheaper fuel resources - firewood, branches.
- Install energy-efficient infrared heating with a high efficiency.

So, now you know that the installation of an effective heating system for a polycarbonate greenhouse in winter will help maintain a favorable microclimate and grow a rich crop of various crops at any time of the year.


