How and from what to make a greenhouse for seedlings with your own hands?
Seedlings for vegetable crops, especially early ones, can be grown both at home and outdoors in a special protective structure - a greenhouse. It allows you to grow strong and strong seedlings and simplify the procedure of hardening. Its design is so simple that it allows you to independently make the structure. How to do this - we will tell below.
Greenhouses for seedlings: types and their features in use
The greenhouse is a small structure (without heating, unlike the greenhouse), consisting of a side part (fully or partially submerged in the soil) and a removable transparent, reflective top. There are a large number of types of greenhouses, varying in type of construction and purpose. Consider the options for mini-greenhouses.

Mini greenhouses for seedlings
Microparms win in front of other constructions in the following:
- universality (it is convenient to maintain the necessary microclimate for any culture in them);
- mobility (they are easy to carry from place to place in the new season, depending on the needs of the grown seedlings);
- low cost (they can be built even from improvised means);
- minimum time (construction is completed in a couple of hours, maximum - in a day).
Did you know? Only in the 19th century did greenhouses become accessible to the common population. Prior to this, only wealthy people used them.
Brick
It is a brickwork, which is the walls of the structure and laid out so that the roof has a slope in the sunny direction. The role of the roof is most often performed by the window frame. It can also be just a wooden frame with a plastic film stretched in it. The design is durable, but it is stationary, and moving such a greenhouse will not work.

Wooden
The simplest and fastest construction option. For such a greenhouse, boards are used that knock down in 2 structures similar to stairs. Then they are placed on the site at a right angle one to one, a "house", and the film is pulled on top. Such a hotbed can be assembled in an hour, and it is easy to move from place to place.

A more reliable version of this design is a wooden base contour, in which PVC pipes are mounted with an arch and tightened with a film.
Figurative
The portable version has the form of a box that does not have a bottom, but has a roof. The roof is glass or film. It can be built outside the site, and then moved and installed in the right place. Most often used to protect crops planted in open ground from sudden frosts.

How to make a greenhouse for seedlings with your own hands
In order to build a home greenhouse yourself, you need skills in creating simple drawings (sketching the structure) and skills in working with carpentry tools (saw, hacksaw, screwdriver). The manufacturing process itself is very simple.
Materials and tools for making a greenhouse
Each greenhouse requires its own list of materials, but in general it looks like this:
Materials:
- wooden bars, boards;
- metal pipes;
- polyethylene film;
- polycarbonate;
- window frames;
- horizontal slats;
- bituminous mastic.
Instruments:
- hammer;
- saw;
- construction stapler;
- shovel;
- hacksaw;
- screwdriver;
- nails
- self-tapping screws;
- roulette;
- Scotch;
- construction cutter.
Video: How to make a greenhouse for seedlings with your own hands
Step-by-step manufacturing instructions
We will describe in detail the process of constructing an arc greenhouse made of polycarbonate, wood and glass, window frames.
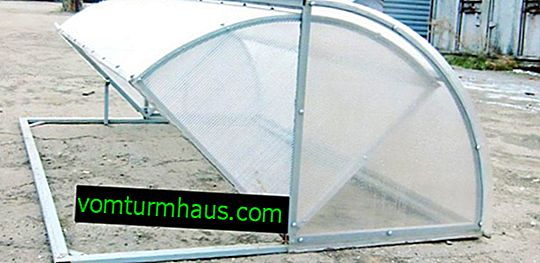
Polycarbonate structure
Consider the simplest construction. The optimal width of the greenhouse is 145-150 cm, the length can be absolutely any. Suppose it is 6 m.
Important! Polycarbonate has honeycombs, so you need to bend it not along, but across their direction, so that the material does not crack.
We begin work on the construction of the greenhouse:
- Cut a polycarbonate sheet (6 × 2.1 m - standard dimensions) using a conventional construction cutter into 4 parts so that one has a length of 90 cm and the rest 170 cm.
- Put the finished polycarbonate parts to the side and begin the construction of the frame.
- For the frame, you need to take 20 m of wooden timber (50 mm) and make 2 guides of 6.4 m in length (6 m is the length of the greenhouse, and 20 cm on each side for ease of transportation of the structure).
- From the remaining beam, cut 4 slats (stiffeners) with a length equal to the width of the structure.
- With the help of self-tapping screws and a screwdriver, attach polycarbonate (sheets with a length of 170 cm) to the guide rails, with the reflecting side out. Screw the screws with an interval of 10-15 cm. Overlap the sheets.
- Seal the joints of sheets with tape so that moisture from the future structure does not evaporate.
- Attach two stiffeners from the ends using self-tapping screws in places where polycarbonate ends. 2 remaining ribs should be placed with an interval of 150 cm from the side.
- From the sheet 90 cm long, cut the end parts. They are also attached with self-tapping screws to the beam, and with adhesive tape in the remaining parts.

Arc greenhouse from a film
This type of design is the easiest to give. To build it, you will need metal arcs with sharp ends and a film. It is optimal to take 10 arcs. Finished arcs must be installed in a row on the selected bed with an interval of 100-180 cm. Above the ground, the arc should rise 120 cm and have a width of 150 cm. Stretch the film from above and fix it at the base with improvised materials (stones). This is the simplest construction option.
There is a more complex and, accordingly, more reliable type of arc greenhouse. The arcs here are made of fiberglass reinforcement.

Step-by-step instruction:
- From the wooden blocks of any thickness, assemble the base of the structure 3 × 1.5 m in size. Connect the bars with bolts for greater rigidity.
- Drill holes with a diameter of 6–8 mm on the side faces of the frame with an interval of 50 cm.
- Insert fiberglass reinforcement with a diameter of 6 mm into the holes. 7 rods are used for the specified dimensions of the greenhouse.
- Stretch the film over the reinforcement, which is attached with a construction stapler to the bars. The bars must be wrapped with a film to isolate from moisture. The film must be pulled from the ends.
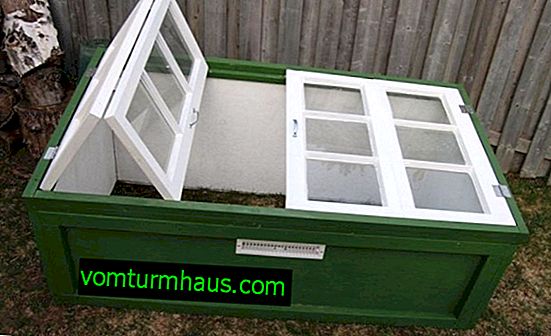
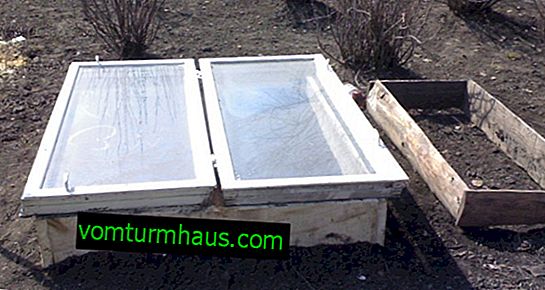
Simple greenhouse from the windows
The dimensions of this structure will depend on how many window frames you have and what size they are (width and height).
Important! In order to have free access to plants in such a greenhouse, it is advisable to make one of the frames open. To do this, you need to attach it to the hinges.
- Cut boards and beams taking into account the dimensions of the window frames. To process wooden parts of a product with bituminous mastic.
- On the bed, lay the perimeter of the structure with a brick.
- Lay the timber on top. Boards are vertically attached to it from the inside using self-tapping screws. The interval between them is slightly less than the width of the frames.
- On the outside to the boards fix vertically another board, so that their edges coincide.
- To the ends of these boards "house" attach the roof rafters.
- On the wooden frame, fix the window frames with the help of screws.

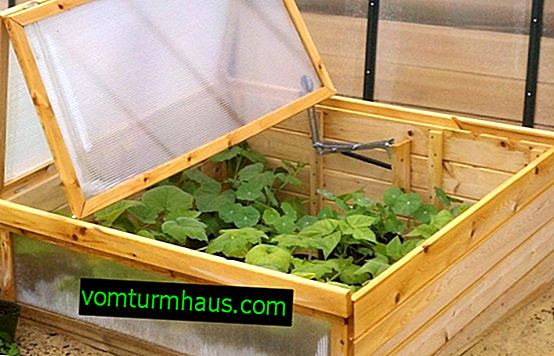
Wooden greenhouse with glass
This design option is stationary.
To build it you need:
- Assemble a rectangular box from the boards or bars of the desired size. Its front wall should be slightly lower than the rear - so that the roof has a slope of 45 °.
- Dig a wooden frame into the ground.
- The roof is made from the window frame.


Features of planting and growing seedlings
To properly grow seedlings, you need to know some features of its planting.
How to choose a suitable place for a greenhouse
The main thing to consider when installing a greenhouse is the good lighting of the place. If you plan to place at home, then this should be the sunny side.
Optimal design location:
- the location of the beds is on a hill;
- if it is necessary to establish in a lowland, then the soil must be drained;
- design orientation - from east to west;
- to protect against wind, build a hedge or install a fence up to 150 cm high and at a distance of 7-10 m;
- for a convenient approach - make paths of stone or gravel.

Greenhouse soil preparation
At a selected location, you should dig a small pit with a depth of 50–70 cm. Cover the bottom with layers of crushed stone (10 cm) and sand (10 cm) to create thermal insulation. Put humus or straw on top. The last layer is biofuel (manure). To establish a greenhouse on this foundation pit and fill it with light soil with the addition of minerals and organics. The soil must also be water- and breathable. It is best to use this mixture: peat, turf land, forest foliage, humus (3: 1: 1: 1).
Seedling planting dates
The exact timing of planting seedlings depends on the type of crop. But in general, you need to focus on the warming of the soil and air. The average air temperature should be + 15 ... + 18 ° С, soils - not lower than + 15 ° С.
Seedling Care
The most important thing in seedling care is watering, fertilizing, cultivating, weeding weeds. The schedule of watering and top dressing depends on the culture, since some of them are more moisture-loving than others, and each plant has its own needs for nutrients. The main thing during irrigation is carrying out irrigation procedures with warm water and in the morning or evening. For top dressing, you need to use organics and mineral complexes.
Weeding and loosening of the soil must be carried out after each irrigation.
Did you know? The first to use greenhouses were the ancient Romans. These designs were mobile, they were taken out on carts to sunny places for better heating of plants.
Practical gardener tips
Tips for planting seedlings and building a greenhouse:
- Transplanting seedlings into a greenhouse is preferably carried out in the evening.
- Do not delay seedlings. It is necessary to carry out the procedure as soon as the seedlings have reached a suitable age.
- If you have planted seedlings, and the weather is clear, then they should be pritenit.
- The metal profile is an ideal material for the frame.
- It is better to install temporary structures on a wooden foundation, and for stationary use of a brick is optimal.
- Polycarbonate combines the optimal price, quality and ease of use, so it is widely used as a covering material.

As you can see, assembling a greenhouse with your own hands will not be difficult. Its design can be both mobile and stationary. The costs of its construction in time and finance are minimal.