Cucumbers Masha f1: characteristics, planting and care
Modern gardeners have long grown a hybrid of cucumber Masha F1, which is produced by the Dutch company Seminis. Everyone who at least once raised this hybrid had the opportunity to appreciate the remarkable yield, excellent fruit taste and ease of cultivation.
In this article we will consider the characteristics of the cucumber Masha F1, we will tell you how to grow this hybrid from seeds (direct sowing into the soil and through seedlings) and how to care for it.
Grade description
| Selection Country | Dutch company Seminis |
| Plant type | Determinant |
| Type of pollination | Parthenocarpic (self-pollinated) |
| Ripening time | Early ripening (the beginning of fruiting from the 36th day) |
| Bush characteristic | Weakly branched, with an ovary of 5-6 cucumbers in each internode |
| Productivity | In a greenhouse up to 11 kg per 1 square meter |
| Fetal weight | Up to 100 g |
| Green length | Up to 11 cm |
| Fetal shape | Cylindrical, coarse peel of the fetus |
| Application | Fresh use, canning, salting |

Advantages and disadvantages
- pros
- determinism (a hybrid has an unlimited growth point);
- moderate branching;
- resistance to diseases and pests;
- early ripening;
- long fruiting period;
- parthenocarpy (self-pollination);
- yield potential;
- great taste of fruits, without characteristic bitterness;
- fruits of the gherkin type (medium-sized);
- bunch fruiting;
- suitability for conservation (preservation of density).
- Minuses
- tendency to overgrow fruit;
- rough skin;
- virtually absent cucumber flavor;
- variable productivity in the open ground (hybrid productivity is very dependent on the vagaries of the weather).

Sowing seeds for seedlings
The seedling method of growing hybrids has its advantages:
- allows you to get a crop early;
- provides an opportunity to get a crop in the northern regions;
- increases the fruiting season.
Optimal timing
Experts recommend sowing hybrid planting material to obtain viable and strong seedlings 30–35 days before the expected date of planting at a permanent place of cultivation.
For example, if the estimated date of planting is May 15, then you need to sow cucumbers no earlier than April 10-15. It is not recommended to sow with a large run in time, the plant reacts poorly to the roots disturbed during the transplant, starts to hurt and stops growing for a long time.

Soil mix
Ready-made soil mixtures for growing cucumber seedlings can be purchased at garden centers.
You can also prepare soil for seedlings with your own hands. To do this, you need to take:
- 10 kg of chopped peat;
- 5 kg of river white sand;
- a liter jar of wood ash (sifted).

Mix all the ingredients thoroughly, and then bake in the oven, sprinkling on a baking sheet with a layer of 5 cm, at a temperature of 220 degrees for 10-15 minutes. Annealing will disinfect the soil and save it from the presence of pathogenic flora. The soil is ready for sowing seeds.
Gardeners should not forget that no nutrients are present in such soil, therefore, after the appearance of sprouts, young plants will need root and foliar top dressing. Did you know? Cucumbers contain vitamin B1, vitamin B2, vitamin B3, vitamin B5, vitamin B6, folic acid, vitamin C, calcium, iron, magnesium, phosphorus, potassium and zinc.
Capacity for growing
Cucumber seedlings can be grown:
- in peat tablets with a large diameter;
- in peat cups;
- in pallets;
- in any suitable plastic or paper containers with a volume of at least 0.5 liters and with holes in the bottom for water drainage.

Many gardeners adapt all kinds of containers at hand (yogurt cups, cut plastic bottles, tetra milk packs, cardboard boxes of suitable diameter) to grow hybrid cucumber varieties.
In homemade landing tanks, holes in the bottom are also necessarily made. Holes are necessary so that when watering, excess water does not stagnate in the roots and can drain into the pan. This container for growing cucumbers is not very good, since it does not decompose (or decompose for a long time) in the ground, which means that it cannot be buried in the ground.
That is, when transplanting to a permanent place of cultivation, the root system of cucumbers can be injured, which means that the plants will hurt and lag behind in growth. Although it should be noted that for the cultivation of tomatoes that tolerate transplantation almost painlessly, such containers are the best suited.
Seed preparation
Quite often, the seeds of the Masha F1 hybrid, sold in specialized seed stores, are already protected from infections and are ready for sowing, so they do not need to be treated with potassium permanganate or other solutions for disinfection. Such seeds are usually colored green, red or orange.

- Soaking - the seed is wrapped in a moistened napkin and kept at room temperature until sprouts appear. There should be very little moisture on the surface of the seeds, since excess water will prevent oxygen from entering the seeds. Soaking seeds can be done in ordinary water, as well as in growth stimulators purchased in the store (epin, emistim). As a liquid for germination, you can use melt water or natural growth stimulants (honey or aloe juice diluted with water).
- Hardening - wrapped in a damp cloth, the seed that has bent over is placed for a couple of days in a refrigerator (on the side wall). Hardened seeds are immediately planted in the ground, this procedure increases their resistance to low air temperatures. Did you know? Cucumbers contain a sufficient amount of sugar, B vitamins and electrolytes to replenish the necessary nutrients lost by the body in the fight against stress.
- Disinfection - the outer shell of seeds can carry pathogenic flora, which, gradually developing, over time will lead to the emergence of diseases on adult plants. To avoid this, the seeds are treated in a pale pink solution of potassium permanganate. To disinfect, it is enough to withstand the seeds in the solution for 10-15 minutes, after which they must be washed with clean water.
Video: seedbed preparation of cucumber seeds
Preparing seeds for planting is a necessary and important procedure: it reduces the time until the first sprouts appear, positively affects the plant's resistance to stress and contributes to a higher yield of the hybrid. Important! If the gardener wants to speed up the sowing of long-stored seeds of cucumber (6-8 years), they should be aerated for 18 hours. The aquarium compressor is lowered into a liter jar of water, where the seeds are wrapped in gauze. After such aeration, the seed is immediately planted in the ground.
Sowing seeds
Depending on the seeding method, some steps vary significantly. Consider the two most popular ones.
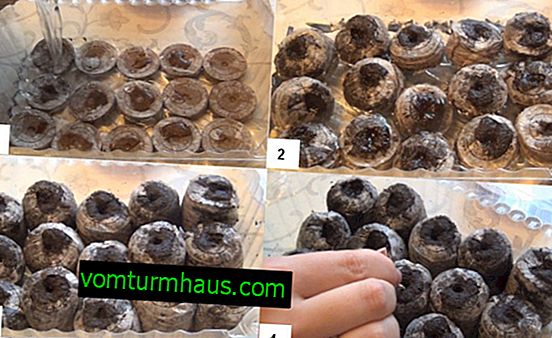
Sowing in peat tablets
They can be purchased at any specialized seed store. Peat tablets come in different diameters; for growing cucumber seedlings, it is recommended to take the largest, small diameter tablets are used for growing flower and strawberry seedlings.

How to sow:
- Warm water is poured into a large low bowl with a wide bottom (in no case hot). For processing 10 peat tablets, 300–500 ml of liquid will be sufficient.
- Peat tablets are laid out at the bottom of the bowl, covered with water, and left to swell evenly for 15–30 minutes. During this time, the tablet absorbs water and the peat in it swells, flat disks turn into cylindrical peat cups with a gauze shell, which prevents them from spilling. In well-absorbed peat cups, there are no dry or hard parts left.
- Peat tablets ready for sowing are removed from the bowl and set in a flat container with sides (pallet). This is necessary in order to make it convenient to water the seedlings under the root. Every two or three days, a little warm water is poured into the pan, which will gradually be absorbed into the glasses. In this pan, plants will be grown for the first 10 days of life.
- In the upper part of each peat cup, 2 seeds of the Masha F1 hybrid are laid out at a distance of one and a half centimeters from each other, and by pressing with a finger, they are deepened in moist peat (not deeper than 2 cm).
- At the end of sowing, the pan, with peat cups standing in it, is covered with a transparent cover or plastic film and set for germination in a dark and warm place. The film will create a greenhouse effect and prevent the water from evaporating too quickly.
- A greenhouse with germinating seeds must be constantly monitored, it is assumed that the sprouts will appear on the third or fourth day. It is impossible to suppose that the greenhouse with young sprouts remained closed for a long time, this will lead to elongation of seedlings.
- After the first sprouts appear, the pallet with peat cups is placed on the window or on a special table for seedlings, which has a backlight. The transparent cover or polyethylene is removed. The seedlings standing on the window are aired twice a day, opening the window in the morning and evening.
- When the first real leaf appears on seedlings - peat cups in the pan are pushed so that a distance of 5 cm is formed between them. If the size of the pan does not allow this, you can put each peat cup in a separate pan, for example, cut from the bottom of a plastic bottle. With the advent of each new leaf - seedlings are spreading wider and wider. This is due to the need for access of sunlight and oxygen to each plant.
- When the time comes to plant young plants in a permanent place, peat cups (already well braided by the roots of a cucumber) are simply installed in the planting pits and covered with soil. When landing, it is necessary to ensure that the surface of the cup coincides with the surface of the soil, that is, you do not need to deepen them too much.


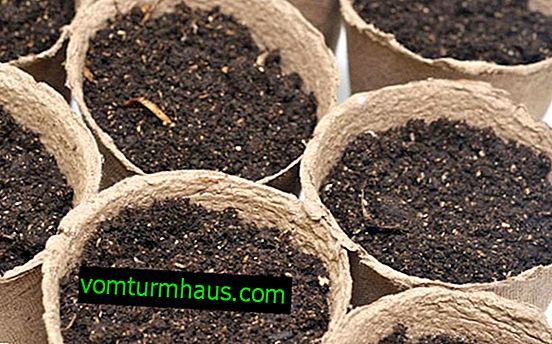
Sow in peat mugs
Peat cups are also purchased in gardening shops; it looks like an ordinary pot for seedlings with a hole for draining water in the bottom. The popularity of this type of pots for seedlings is explained by the fact that the material from which they are made is made of ground and softened peat with the addition of humus.
Young plants grown in a peat cup are planted in the ground together with a tank, the walls of which gradually decompose in the ground and serve as fertilizer for the roots. In the process of transplanting into the open ground, the delicate root system of the cucumber does not suffer at all.
How to sow:
- 2 seeds are planted in each pot, after 10 days one of the plants is removed, leaving it stronger and stronger. The seed planting depth is not more than 1.5–2 cm. A deeper planting can delay the emergence of sprouts on the soil surface, and a too shallow planting will result in the seed coat remaining on the sprout preventing the spread of the first (fake) leaves. The distance between the two seeds is 3 cm. By removing the extra seedling, they should never be pulled out of the ground, but cut off at the point of contact with the ground. This is done so as not to damage the root system of a nearby cucumber.
- The planted seeds are lightly watered with warm water, and each pot is wrapped in a transparent plastic bag, after which it is left in a warm and dark place for two to three days to sprout the sprouts. An individual drip tray for water drainage (saucer) must be provided for each landing tank. After the first sprouts appear, caring for them will be identical to caring for cucumbers grown in peat tablets.

Important! The culture of cucumber, like pumpkin, unlike other garden crops, very poorly tolerates transplantation. Even transplantation by transshipment does not give an absolute guarantee that the cucumber root system will not be disturbed or damaged. Cucumber is a very capricious and tender plant that reacts sharply to changes in growing conditions: sharp changes or lowering of air temperature, humidity, damage to the root system.
Seedling Care
Cucumber is an annual subtropical plant and bears fruit best in a warm and humid environment, with good lighting and the availability of nutrients. This plant is very sensitive to adverse environmental conditions.

Cucumbers love heat, therefore, for the normal development of seedlings, the correct temperature regime is very important. For germination, the most acceptable temperature is in the range +25 ... + 35 ° C. After hatching, the temperature drops to +22 ... + 24 ° C, and from the second week of life until the end of the growing season, the optimum temperature for cucumbers is +20 ... + 22 ° C.
Air temperature affects vegetative growth, fertilization of flowers, growth and quality of fruits. The growth rate of cucumber bushes depends on the average daily temperature: the higher it is (≤ + 25 ° C), the faster their growth. The optimal air temperature is not always the same, and directly depends on the period of development of the plant. Important! When the temperature drops below +15 ° C, the seedlings are inhibited and freeze in growth, and adult cucumber plants cease to grow and bear fruit, the ovary decays directly on the cucumber lashes. Germination conditions of cucumber seeds:
- at a temperature of +25 ° C to +35 ° C, with a sufficient amount of moisture - the seeds germinate in 2-3 days;
- at a temperature of +12 ° C - for peeling seeds, it takes from 12 to 20 days (at this temperature, many seeds rot).

Young seedlings are very demanding on lighting, so the window sill is the most suitable place for its location. Only windowsills of windows facing north are not suitable for this. Also, for growing cucumbers, a special seedling table is suitable, equipped with a lamp for additional illumination of plants. It is necessary to avoid too close the location of seedlings, since thickening contributes to the development of diseases (black leg, powdery mildew).
On cloudy days, the seedlings on the window also require additional lighting. If the gardener does not have a special lamp, it can be replaced with a conventional fluorescent lamp (housekeeper). A table lamp with daylight is easy to install (or fix) on the windowsill and direct its light to the seedlings. Did you know? Cucumber will help keep the skin young and healthy. It can revitalize the upper and inner layers of the dermis, cleanse and tighten pores, smooth wrinkles and eliminate dark circles under the eyes. Since young cucumbers are not grown too early, usually in April-May, most often when grown on windows, you can do without additional lighting.

Cucumbers are watered only under the root, and by no means on the leaf. The sprinkling method is not suitable, as it contributes to the development of fungal diseases on immature cucumbers. The most successful is the method of watering in a pan (saucer), moisture is gradually absorbed into the pot through an opening in the bottom of the tank and wets the earthen lump, along with the roots in it.
Water for irrigation is taken only warm, plants respond well to rain and melt water. It is undesirable to water the seedlings too often to avoid decay of the root system. Watering is recommended when the topsoil in the landing tank dries up.
Top dressing
After a while, the cucumber root system pulls out all the nutrients from the soil in which it grows, and the plant needs to be fed. As a liquid top dressing, you can use store-bought fertilizer for vegetables, it provides all the macro- and microelements necessary for the normal development of a cucumber.
Young plants are undesirable to feed with mullein or chicken droppings. Care must be taken in this, as these natural fertilizers are very strong and can burn immature seedlings.
Video: feeding cucumber seedlings
You can carry out such dressings (at the rate of 1 gram per 10 liters of water - per square meter):
- superphosphate - 5–10 g (before fruiting), 15–20 g (during fruiting);
- potassium sulfate - 20 g (before fruiting), 20 g (during fruiting);
- ammonium nitrate - 10 g (before fruiting), 10 g (during fruiting).
Seedling hardening
The primary hardening of seedlings is carried out since the appearance of the first true leaf. For this, a window opens for 30 minutes during the week in the morning and in the evening. When the temperature in the street rises above +15 ° C, pots with young shoots are taken outside: in the first three days for half an hour, in the next three days for an hour, then for three hours. Did you know? Cucumber is one of the very first domesticated vegetables. People tried it about 4 thousand years ago, began to grow it near their homes and use it not only for food, but also for medicinal purposes. Когда температура воздуха на улице превысит отметку в +20 °C, то рассадные горшки выносят на улицу после 9 часов утра и забирают в дом после 17 часов. Горшочки с рассадой устанавливают в полутени, так как молодые растения могут сгореть на солнце. Такой режим закаливания продолжается до высадки огурцов на постоянное место.

Planting seedlings in a permanent place
Хорошая огуречная рассада имеет:
- мощный кустик не более 30 см в высоту, с короткими междоузлиями;
- тёмно-зелёные крупные листья в количестве 5–6 штук;
- возраст, не старше 30–35 дней от появления ростков;
- хорошо разветвлённую корневую систему.
Пересаживать рассаду из грунта в грунт (как помидоры) нежелательно, так как в ответ эта культура начинает болеть и отставать в росте. Как результат – недополученный урожай. Только выращенная в торфоперегнойных стаканчиках или торфяных таблетках рассада огурца не будет страдать во время пересадки методом перевалки. Important! Огородник должен (закрывая или приоткрывая парник) регулировать температуру воздуха внутри так, чтобы она не поднималась выше +25 ° C. Более высокие температуры приведут к повреждению или неправильному развитию молодых растений. При высадке рассады необходимо обратить внимание на то, чтобы между посадочными ямами было расстояние не менее 25–30 см.

Landing immediately in open ground
При высадке рассады в открытый грунт важно учитывать погодные условия. Огурцы боятся заморозков и в грядку они могут быть высажены только тогда, когда почва прогреется на глубину 15 см до температуры + 15 °C, и больше не ожидается мороза.
Для получения хорошего урожая ранних огурцов из рассады, лучше всего устроить «тёплую» грядку:
- Для этого на месте будущей грядки выбирается верхний плодородный слой грунта и откладывается в сторону.
- В получившуюся траншею укладывают любую органику (навоз крупного рогатого скота, овощные очистки, траву, ветки и листья).
- Лежащий в сторонке слой плодородного грунта укладывают поверх заполненной органикой траншеи.
- Подготовленную таким образом грядку поливают тёплой водой.
- Поперёк грядки устанавливают несколько металлических или деревянных дуг (из проволоки, ивовых веток). Дуги будут поддержкой для полиэтиленовой плёнки.
- На дуги набрасывают плёнку, края которой присыпают землёй или прижимают кирпичами.
- Под плёнкой грунт начинает быстро прогреваться, и через 7–10 дней грядка готова к высадке рассады.
Видео: высадка рссады огурцов в открытый грунт
Optimal timing
В нашем климате огурцы высеваются в открытый грунт в середине–конце мая, когда температура воздуха достигает + 21...+23 °С. В тёплую погоду первые огуречные росточки появляются на поверхности грунта через 4–5 дней, при более прохладной температуре – через 6–7 дней.
Seat selection
Огурцы любят воздухопроницаемые, рыхлые почвы, быстро прогревающиеся и с достаточным количеством гумуса. Рыхлая почва быстро впитывает влагу и выводит излишки жидкости от корней, что очень важно для огурцов, а хорошо заправленная удобрением почва обеспечит культуру всеми необходимыми для роста веществами и микроэлементами.
Реакция почвы должна быть щелочной. Заправлять грядку навозом лучше всего осенью, отходы жизнедеятельности крупного рогатого скота являются лучшим и экологически чистым удобрением для огурцов.
При выращивании огурцов нужно помнить об использовании севооборота и правильных предшественниках. Соблюдение севооборота очень важно, например, после кукурузы, огурцы можно посеять на той же грядке только через 3–4 года.

- Tomatoes
- свёкла;
- potatoes;
- beans;
- peas;
- onion;
- злаки.
Хорошие соседи для огурцов:
- fennel;
- corn;
- parsley;
- peas;
- beans;
- celery;
- подсолнух.

Огурцы боятся холодных ветров, поэтому огуречные грядки обсаживают ветрозащитными кулисами из высоких растений. Это могут быть несколько рядов кукурузы, подсолнечника или подвязанные на шпалеру горох, бобы или вьющаяся фасоль. Такую естественную ветрозащитную стенку устраивают с северной стороны от огуречных насаждений.
Слабым местом огурцов является нежная корневая система, склонная к загниванию при излишнем переувлажнении почвы. Поэтому при выборе места под грядку, желательно выбирать места на возвышенности, без близкого залегания грунтовых вод. Did you know? Огурцы имеют очень низкую калорийность, всего 16 ккал на 100 граммов веса плода.
Scheme and landing depth
Слишком густой посев огурцов может грозить нехваткой питательных веществ и света для каждого конкретного растения, а изреженный посев в итоге обернётся недополученным урожаем. Для удачного выращивания гибрида огурца Маша F1 производитель рекомендует густоту посева не превышающую 3–5 растений на один квадратный метр грядки.

- В одну строчку, то есть в один ряд. Благодаря своей простоте этот метод очень популярен. За полчаса перед посевом почва хорошенько проливается прогретой на солнышке водой, по центру грядки делается продольная канавка длиной 2–4 см, в которую по одному раскладываются семена гибрида на расстоянии 15–20 см друг от друга. Канавка с разложенными семенами засыпается грунтом вровень с поверхностью грядки. Рядом можно расположить несколько однострочных грядок с огуречными гибридами, в этом случае расстояние между ними должно быть не менее 70 см. Эта схема подходит как для выращивания гибридов на уличных грядках, так и для их выращивания в теплице.
- В две строчки, то есть в два ряда, которые расположены на расстоянии 30–50 см друг от друга. Огурчики, растущие в каждой из строчек, смещены в шахматном порядке относительно друг друга. Это позволяет почти на треть усилить освещённость каждого куста. Расстояние между двумя двухстрочными грядками выдерживается в диапазоне от 0, 8 м до 1, 5 м. Широкие междурядья позволяют с удобством ухаживать за насаждениями (полоть, поливать, мульчировать), а также облегчают сбор урожая.
- Квадратно-гнездовой способ – подготавливаются посадочные ямы диаметром и глубиной в 12–15 см, с расстоянием между ними до 1 метра. Каждую посадочную яму заправляют органикой, которую перекапывают с грунтом, после чего уплотняют дно, где раскладывают (по внешнему кругу) от 7 до 10 семечек гибрида. После появления на растениях 1–2 настоящих листов, посадки прореживают, оставляя всего 4 или 5 наиболее здоровых и крепких огурчиков. При желании, в дальнейшем над каждой посадочной ямой устанавливают опору, для того, чтобы огурцы могли плестись вверх. Также можно по центру посадочной ямы, одновременно с высевом семян, высеять одно или два зёрнышка кукурузы. Кукурузные стебли будут расти одновременно с огуречными стеблями, и послужат им опорой для плетения.

How to care for crops
Только вырастить крепкую рассаду или вовремя посеять семена огурца – мало, нужно в дальнейшем за ними правильно ухаживать. Вовремя поливать, подкармливать, пропалывать и рыхлить землю, не задерживать сбор плодов и проводить профилактику болезней и вредителей.
Watering
- Огурцы очень любят полив, опытные огородники говорят о них, что эти растения любят мокрые ноги и сухую голову. Проводится только корневой полив, огурцы по листу не поливаются, во избежание развития грибковых заболеваний. В жаркую погоду полив проводят каждый вечер, после 17 часов, тогда, когда спадёт дневной зной.
- С помощью тяпки на расстоянии 10–15 см от корней растений проводится продольная борозда глубиной до 10 см. Получившаяся в результате канава для полива тянется от одного края грядки до другого, параллельно ряду растений. Вода для полива заливается в эту поливочную канаву и уже оттуда, постепенно, поступает к корням огурца.
- Также для орошения можно применять капельный полив, специальная недорогая лента продаётся в магазинах для огородников и стоит довольно недорого. Лента капельного полива позволяет всегда держать почву под огурцами увлажнённой и, одновременно, экономить не дешёвую воду.
- Ежедневно на каждое взрослое растение требуется не менее 3 л воды. В сырую и холодную погоду огурцы не поливают.

Top dressing
Огурцы очень любят органические удобрения, особенно подкормки на основе куриного помёта или навоза крупного рогатого скота.
Как развести куриный помёт:
- Для большого количества рассады – в одно десятилитровое ведро укладывают помёт так, чтобы он занял 1/6 часть ёмкости, и доливают водой до верха. Для малого количества рассады – на дно литровой банки укладывают 1/6 часть помёта и заливают водой горлышка.
- Ёмкость обязательно закрывают крышкой, это воспрепятствует испарению азота, и помещают на неделю в солнечное место для брожения.
- Через неделю перебродившая жижа готова – в результате получилось концентрированное удобрение. Для подкормки рассады концентрат разводят в пропорции 1:20, то есть на одну мерку жижи берут 20 мерок воды. Удобрение нужно подливать под корень растений через 10 минут после предварительного полива грунта, то есть по мокрой земле. Проводить подкормку желательно в вечернее время, когда жара спадёт.
- Подкормку раствором коровяка или куриного помёта проводят каждые 10 дней в течение всего вегетационного периода. Для огурцов возрастом старше 2 месяцев концентрированное удобрение разводят с водой в пропорции 1:10, то есть на каждые 10 л воды добавляют 1 л концентрата. Под корень каждого растения подливают 1 литр разведённого удобрения.

Bush formation
Огуречный гибрид Маша F1 предназначен для выращивания на шпалерах, обладает высокой силой роста и нуждается в постоянном формировании куста. Если этого не делать, плети растения могут заплести всё доступное пространство, что усложнит плодоношение и ускорит возникновение грибковых заболеваний, таких как мучнистая роса.
Маша F1 является партенокарпическим гибридом, а это значит, что для опыления цветов огурец не нуждается в насекомых-опылителях и основной урожай у него приходится на главную (центральную) плеть.
Формируем куст:
- Пасынки, растущие из первых четырёх листков на главном стебле, необходимо удалить полностью (ослепить).
- Далее оставляем пасынки, растущие между главным стеблем и 5, 6, 7, 8, 9, 10, 11, 12, 13, 14, 15, 16 и 17 листками, и позволяем им расти до тех пор, пока на каждом из них не разовьётся настоящий листок с завязью в пазухе. После этого на каждом из перечисленных пасынков делается прищипка.
- Пасынки в пазухах 18, 19 и 20 листков на главном стебле тоже оставляются. Огородник должен дождаться, когда на них сформируется по три полноценных листа с огуречной завязью, после чего делается прищипка этих пасынков после третьего листа. К этому времени растение достигнет высоты более 2 метров.
- Ко времени достижения растением этой высоты – лето начинает идти на убыль, но если у огородника есть желание продлить плодоношение гибрида, то формировку необходимо продолжить. Далее главную плеть лианы перебрасывают через верхнюю перекладину шпалеры. Это делается аккуратно, так, чтобы не повредить и не сломать стебель растения. Его рост направляют вниз (к земле) или в любую из сторон по верху шпалеры. В пазухах всех последующих листьев оставляют по одному пасынку, на которых будет сформировано по одному полноценному листу + завязь, далее пасынок прищипывают. Такую формировку гибрида продолжают до наступления холодов.
Видео: формирование куста для повышения урожая
Soil care
Прополка
В течение лета грядки необходимо пропалывать, не допуская появления и разрастания сорняков. Сорные растения служат источником размножения тли и других насекомых-вредителей, которые постепенно перебираются на огуречные плети.
Прополку и рыхление проводят еженедельно. Помимо очищения грядки от сорняков, прополка рыхлит грунт, чем обеспечивает беспрепятственный доступ кислорода к корневой системе растений.
Мульчирование
Очень удачный агрономический приём, хорошо зарекомендовавший себя в течение многих лет – мульчирование поверхности грядки. Мульча препятствует всходам сорных растений и сохраняет влагу в почве, не давая ей испаряться.
В качестве мульчи можно использовать опилки деревьев не хвойных пород, скошенную, и чуть увядшую, траву, полуперепревшие листья, чёрно-белое агроволокно. Одним из важных преимуществ мульчирования является то, что огородник в течение целого сезона не будет заниматься прополкой и рыхлением почвы под огурцами.

Если огурцы выращиваются без применения мульчирующего агроволокна, то по достижению ими 5–6 настоящих листьев, растения окучивают грунтом на высоту 15–20 см. Этот агроприём поможет нарастить гибриду дополнительную корневую систему, чем улучшит жизнестойкость растения. Did you know? Если человеку трудно выпить так необходимые для организма восемь стаканов воды в день, можно переходить на поедание огурцов. Это овощи на 95% состоят из воды, к тому же огуречный салат поможет обуздать голод.
Bush tying
Огуречные плети необходимо подвязывать так, чтобы они не соприкасались с почвой. Для подвязки используют синтетические шнуры или бумажный шпагат. Подвязку рассады начинают через 2 недели после высадки на постоянное место, или после появления на растении 5–6 полноценных листков.
Для каждого огуречного растения к наивысшей точке шпалеры вертикально подвязывают один шнур, второй конец которого привязан к основному стеблю огурца. По мере роста Машу F1 аккуратно оборачивают вокруг натянутого шнура.
Видео: как правильно подвязывать огурцы
Preventative treatment
Чтобы избежать наиболее распространённых заболеваний огурца, необходимо соблюдать несколько основных правил. Они подходят для профилактики всех огуречных заболеваний.
Основные правила профилактики заболеваний на огурцах:
- Необходимо придерживаться севооборота и не выращивать огурцы в одном месте несколько лет подряд. В идеале, на то же место огурцы возвращают только через 4 года.
- Выращивать устойчивые к болезням (вредителям) огуречные сорта и гибриды.
- В конце сезона, после сбора урожая важно тщательно уничтожать все растительные остатки.
- Каждый год необходимо проводить дезинфекцию почвы, где выращивались огурцы.
- Нельзя слишком перекармливать огурцы органикой, то есть азотными удобрениями.
- Необходимо закрывать огуречную теплицу на ночь, чтобы среднесуточная температура не опускалась ниже +23 °C, а огурцы, растущие на открытой грядке, необходимо прикрывать плёнкой в холодные ночи, для поддержания температуры не ниже + 18 °C.
- Огурцы регулярно поливают, и только тёплой (температуры воздуха или чуть теплее) водой.
- Огуречные теплицы нуждаются в хорошем проветривании.
- В обязательном порядке с грядки удаляются все загрязнённые части растения.

Harvesting
Урожай на огуречном гибриде собирают каждые два–три дня, не давая перерастать плодам. Этот партенокарпический гибрид склонен к перерастанию плодов, поэтому задержки сбора нежелательны. В характеристиках Маши F1 сказано, что длина созревших огурцов равна 11 см, но этого не стоит дожидаться и огурчики необходимо срывать раньше, при достижении ими длины 7–8 см. Знаете ли вы? Половина чашки нарезанных огурцов содержит только 8 калорий, но вмещает в себя 10% рекомендуемой для взрослого человека суточной дозы витамина К. Партенокарпические гибриды огурца, такие как Маша F1, уже давно приобрели заслуженную популярность среди огородников, которые ценят по достоинству его вкус и урожайность. Выращивая рассаду этого гибрида, можно получить очень ранний урожай вкусных плодов, а посев огуречных семян в грунт обеспечит огородника более поздним урожаем корнишонов.


