Cucumber Hector F1: variety description and cultivation features
Juicy and crispy cucumbers are grown in many suburban areas, and one of the popular varieties is Hector F1. This hybrid gives a fruit crop shortly after planting seeds. It is unpretentious to climatic conditions and does not require specific care. The characteristics of the variety, its pros and cons, especially the planting of seeds and cultivation of crops - further in the article.
Features and general characteristics of the variety
Hector F1 cucumber variety was bred in Holland at the beginning of the XXI century. A team of scientists from the selective economy Nunhems (Netherlands) worked on its creation. Breeders wanted to get an ultra-early variety of cucumbers, which would be characterized by high yields and excellent commercial qualities of the fruit. Today, this variety is widely distributed in Europe and Russia.

The main characteristics of the variety of cucumbers Hector F1:
- Early ripe variety - the first fruits ripen about 1 month after seed germination.
- The bush is determinant, compact, reaches a height of about 80 cm. The leaves are dark green, medium in size.
- A large number of ovaries form on each plant. Fruiting is friendly and lasts for 140 days, until the very beginning of autumn.
- From 1 bush you can collect up to 3 kg of ripe cucumbers. Productivity from 1 m² on open ground is 3.9–6 kg, and in a greenhouse - up to 16 kg (when grown on a trellis).
- Fruits are medium in size and 10-15 cm long. The mass of each specimen is about 100-110 g, and the average diameter of ripe greenery is 3 cm.
- Outside, the fruits are covered with a thin green skin with a noticeable layer of wax coating. On its surface there are large tubercles on which small white spines are located.
- They have a very juicy and crisp pulp with a pleasant fresh aroma. It has a dense structure and a sweet taste without bitterness.
- Hector F1 cucumbers are recommended to be used fresh, and also to use them for the preparation of canned preparations for the winter.
Did you know? The name "cucumber" comes from the ancient Greek word "aguros", which translates as "unripe, unripe."
Pros and cons of cucumber varieties Hector F1
This hybrid is grown not only on private land, but also on an industrial scale. Compared with other varieties of culture, this variety has significant advantages, which attract many gardeners.

- The advantages of the variety include:
- early ripening of the first crop;
- self-pollination of plants;
- cold resistance;
- unpretentiousness to soil composition and leaving;
- good presentation and taste of the fruit;
- compact bush sizes;
- friendly and prolonged bearing;
- good storage and transportability;
- the fruits do not outgrow - their maximum size is not more than 15 cm;
- good immunity to diseases;
- universality of the use of fruits;
- high germination of seeds.
Did you know? The pulp of cucumber is 95% water.
- Despite the long list of advantages, some gardeners note a number of negative qualities in this culture:
- small fruit size;
- densification of the peel with a long stay of fruits on the bush;
- high price of seeds;
- the appearance of a bitter taste in Zelentsy with insufficient watering.
Optimal growing conditions
To achieve the best yield indicators, Hector F1 cucumbers are recommended to be grown in regions with a temperate or subtropical climate.

List of conditions necessary for successful cultivation of the variety:
- Loose and fertile soil with low acidity - it contains all the necessary nutrients, well passes air, moisture and heat to the roots.
- Groundwater level - about 1.5–2 m from the surface of the earth on the site. With a closer occurrence of groundwater, the roots of plants can rot due to an excess of moisture.
- Good predecessors - it is recommended to grow cucumbers in the area where cabbage, legumes, mustard or buckwheat used to grow. But planting after pumpkin crops and carrots is prohibited.
- Suitable air temperature - for normal growth and abundant fruiting, it should be +20 ... + 28 ° C during the day and not lower than + 15 ° C at night.
- A sufficient amount of sunlight - this not only stimulates the growth of lashes and the formation of ovaries, but also contributes to a good warming of the soil near the bush to protect against diseases.
Important! Hector F1 cucumbers are resistant to short-term cooling, but when the air temperature drops to + 0.5 ° C, the plants die.
Growing and caring for cucumbers
This variety can be grown both by direct sowing of seeds in open ground, and by seedling method. In this case, it is necessary to correctly carry out the procedure for planting planting material in the soil, and when seedlings appear, provide them with the necessary care.
When planting crops in an open area, seeds or seedlings should be placed so that there are no more than 5-6 bushes on 1 m² of area.


Seed soaking
Hector F1 cucumber seeds are characterized by excellent germination and do not require soaking before planting.
But in order to reduce the time required for the appearance of the first seedlings, it is recommended to prepare planting material using these simple steps:

- Sort through seeds, remove damaged specimens.
- Place planting material in a glass of salted water - discard material remaining on the surface of the water. Remove the seeds dipped to the bottom of the glass from the water and dry on a paper towel at room temperature.
- Disinfect the seeds - for this you need to soak them in a 1% solution of potassium permanganate for half an hour, then rinse with clean water and dry.
- To enrich planting material with nutrients, immerse it in an ash solution (2 tbsp.spoons of substance per 1 liter of water) for 20-30 minutes.
- To harden the seeds 2 days before sowing in an open area, wrap them in a damp cloth and place in the refrigerator (temperature 0 ... + 2 ° C) - under such conditions, the planting material must be kept until planting.
When growing Hector F1 cucumbers by seedlings 3 days before sowing, it is recommended to start seed germination. To do this, they need to be wrapped in a piece of damp cloth and put away in a warm place (but not on the battery). After the appearance of small sprouts on the planting material, it should be planted in individual cups.
Read more when to plant cucumbers for seedlings.
Direct landing in open ground
Before sowing seeds, the earth in the selected area also needs to be prepared. To do this, 3 weeks before planting, it is dug up to a depth of 20-30 cm, while adding peat or humus. You can plant Hector F1 cucumber seeds in an open area in the second half of May or early June.

Step-by-step instructions for planting Hector F1 cucumber seeds in open ground:
- Prepare small recesses in the ground, placing them according to the above scheme. The depth of each hole should be 2-3 cm.
- In each well, put the seed, placing it horizontally. The sharp part should be directed upwards.
- Sprinkle indentations with loose soil. Sprinkle a little surface of the earth with warm water.
- Cover the bed with a film to create the most comfortable microclimate conditions for seed germination.
Seeds that have undergone preliminary preparation germinate within 48 hours after planting in the soil. Untreated planting material sprouts in 3-4 days.
Important! The air temperature at the time of planting the crop should be at least + 20 ° C.
After the emergence of young shoots, you should briefly raise the film for several minutes during the day so that the plants adapt to the conditions of the open area. The time spent to land without shelter should be gradually increased. The film layer can be completely removed only after the minimum night temperature reaches + 15 ° С.
Seedling cultivation
For the purpose of earlier ripening of the crop, it is recommended to first grow seedlings. This can be done indoors or in a greenhouse, and then transplanted young seedlings in open ground. Sowing seeds for seedlings depends on the climatic conditions of a particular region and is carried out in late March or in the first decade of April.

A detailed algorithm for growing seedlings of the variety Hector F1:
- Prepare small individual containers with drainage holes at the bottom. Fill them with soil warmed up at room temperature from the garden, after adding a little humus and dry sawdust to it.
- Make a small hole about 2 cm deep on the surface of the soil. Place the germinated seed in it so that the sprout is pointing up.
- Sprinkle the recess with earth and gently press its surface with your hands. Sprinkle the surface of the soil with warm water.
- Cover the containers with glass or film and put in a warm and well-lit place for 4–5 days. After this time, green shoots will appear.
- Remove the shelter, and then rearrange the pots with young seedlings on a well-lit window sill. In cloudy weather, seedlings can be placed under an artificial light source.
- As the soil dries in the tanks, carry out moderate watering. When a dense crust appears around the plants, carefully loosen the earth in pots.
- When the first pair of leaves appears on the seedlings, water the seedlings with a solution of fertilizers. To prepare it, dissolve 1 g of nitrate and potassium sulfate, as well as 2 g of superphosphate in 1 liter of water.
- Before transplanting to an open area, re-feed the sprouts of 2 g of potassium sulfate and 5 g of superphosphate dissolved in 1 liter of water.
- 1 week before planting on the site, start hardening seedlings. To do this, take it daily to the open air, gradually increasing the time the sprouts stay on the street.

The mechanism for transplanting cucumber seedlings Hector F1 to an open area:
- Make small holes 3-4 cm deep on the surface of the soil.
- Pour the recesses with a nutrient solution. To prepare it, mix chicken droppings with water in a ratio of 1:20 or use ready-made mineral fertilizers.
- Carefully remove the cucumber sprout from the individual container and place in the hole with an earthen lump.
- Sprinkle the roots of the plant with soil, and then lightly press its surface with your hands.
Important! Cucumber seedlings need to be planted on the site in late May or early June, when the air warms up to + 25 ° C.
Watering and feeding
Hector F1 plants need a lot of water both at the stage of growing green mass and in the process of fruit formation and ripening.
Therefore, you need to water the bushes regularly and abundantly, adhering to such rules:
- use warm water - you can preheat it in the sun during the day;
- irrigate the beds as the top soil layer dries;
- when the cucumber ripening period begins, water the bushes every 4–5 days;
- avoid excessive oversaturation of beds with water - this can provoke root rot;
- for irrigation, it is recommended to use a drip irrigation system;
- water consumption per 1 m² with active growth of the bush - up to 5 l, and during the formation of ovaries and fruits - up to 12 l;
- watering in the morning or in the evening - this will help to avoid the rapid evaporation of moisture from the soil and protect the leaves of the bush from sunburn;
- irrigate cucumbers until the very end of the fruiting period.

So that moisture after watering lingers longer in the soil, beds with cucumbers mulch with a layer of dry straw or sawdust. Usually, Hector F1 cucumber bushes are fed 3-4 times during the season.
In this case, you need to alternate organic and mineral fertilizers:
- 15 days after planting, feed cucumbers with an aqueous solution of ammonium nitrate, potassium salt and superphosphate (10 g of each substance per 10 liters of water).
- When buds appear and the bush is prepared for flowering, water the plants with a liquid solution of fresh grass (1 part green to 5 parts water).
- During the peak of fruiting, add a solution of urea (50 g of the product in 1 bucket of water).
- In the second half of August, if necessary, you can feed the cucumber bushes with a mixture of 10 liters of water and 1 cup of wood ash.
Also learn how to feed cucumbers for growth and increase yield.
Bush formation
Due to the compact size of the plants, the Hector F1 variety does not need forming pruning. But sometimes you still need to remove certain parts of the plants in order to provide Zelentsy with enough sunlight.

The basic rules for the formation of a bush of cucumbers Hector F1 are as follows:
- yellowed whips immediately cut - they weaken the plant and make it vulnerable to disease;
- with a large number of leaves, thin out them - remove excess so that they do not obscure the ripening fruits;
- for quick and even ripening, place curly lashes on the trellis - this is how Zelentsy will get the maximum amount of sunlight.
Read more about how to properly form cucumbers.
Protection against diseases and pests
Hector F1 cucumbers are rarely and weakly exposed to diseases or pests. But under adverse growing conditions or errors in the care of plants, various difficulties can arise that lead to a decrease in the yield of the bush, and in some cases can even cause its death.
The following diseases and pests can threaten this hybrid:
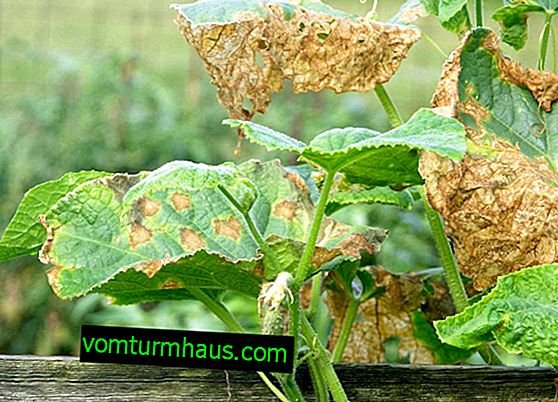
- Bacteriosis Signs of this bacterial disease are through holes on the leaves and brown spots on the surface of the fruit. The infection spreads quickly through insects and drops of water during irrigation and rain. Affected leaves and fruits of the bush must be removed and destroyed, and the plant sprayed with a solution of Fitosporin-M.
- Root rot . The disease affects the roots of the bush and most often occurs as a result of improper watering. At the same time, the leaves of the cucumbers begin to wither, the bush stops growing, and new fruits form and ripen very slowly. When digging up the roots, it is noticeable that they have a reddish color and a rotting structure. In order to save the plant, its stem must be covered with soil and water used for irrigation with a temperature of at least + 22 ° C. In case of severe damage, use chemical preparations (for example, Previkur).

- Aphids . This pest is activated in the middle of summer and feeds on the juice of green leaves of the bush. At the same time, they are twisted and covered with a characteristic sticky coating, and inflorescences and fruit ovaries massively fall off. To get rid of insects, cucumbers should be sprayed with an aqueous solution of wood ash and laundry soap (300 grams of ash and 40 grams of grated soap will be required per 1 bucket of water). In case of severe damage - use insecticides (for example, "Arrivo").

- Whitefly The insect is a small white midge that sucks the juice from the leaves of plants. At the same time, white dots form on their surface, which eventually provoke the wilting of the green mass and the loss of the crop of cucumbers. The leaves of the affected bushes need to be washed with water - this helps to wash off insects. To scare away the pest, you can spray the beds with cucumbers with infusion of garlic (5-6 cloves per 3 liters of water), and with a large number of insects, use chemical preparations (for example, “Karbofos”).


To prevent the occurrence of these difficulties, it is recommended to take simple preventive measures:
- adhere to the above irrigation rules;
- avoid excessive thickening of the beds;
- process plantings with a 1% solution of Bordeaux fluid;
- place beds with cucumbers in a well-lit place;
- disinfect planting material;
- adhere to crop rotation rules;
- fertilize regularly to enhance plant immunity;
- remove weeds around the bushes in a timely manner.
Did you know? Small thorns located on the green skin of a cucumber are designed to remove excess moisture - small drops of dew form on them every morning.
Harvesting and storage features
Since the appearance of the first ripe cucumbers, the bush bears fruit continuously, therefore, it is necessary to harvest the crop regularly as new fruits ripen.

The basic rules for the collection and storage of the crop of cucumbers Hector F1:
- remove fruits from the bush as they ripen - every 2 days;
- Harvesting is carried out in the early morning - at this time the stems of the bush remain elastic and cucumbers are easier to separate from the shoots;
- gently separate the fruits from the lashes, unscrewing their peduncle clockwise;
- Carefully fold the collected greens into prepared containers in order to avoid mechanical damage to the peel;
- the crop is recommended to be stored in a dark cellar with good ventilation at a temperature of +5 ... + 7 ° C;
- the shelf life of fresh cucumbers under these conditions is up to 7 days.
Variety Hector F1 is a real find, even for an inexperienced gardener, and allows you to get a generous crop of cucumbers with minimal care for the beds. Using the recommendations listed in the article, you can successfully grow this hybrid for personal needs, and on a larger scale.