Claudio pepper: description and taste
Sweet pepper is a popular vegetable among gardeners. There are many varieties and hybrids on the bell pepper seed market. Claudio pepper arouses interest among gardeners because of the taste and nutritional value. A detailed description of the variety is described later in the article.
Description and characteristics of the variety
The hybrid was bred by Dutch breeders from Nunhems in the late 1990s. Refers to early ripening, as the ripening period is 80–85 days after transplanting seedlings in open ground. Seedlings form sprawling bushes 80–90 cm high. Broad dense leaves form on the bushes, so the fruits ripening under them are protected from the negative effects of sunlight.
Important! When ripening, the fruits do not blush for a long time, and at the stage of technical maturity they are covered with red spots, so you need to collect them in green or absolutely ripe.
Ripe fruits acquire a rounded cuboid shape, and the skin has a glossy surface. Peppers that are at the stage of technical maturity have a green color, and as they ripen, they acquire a red color on the skin and pulp. The average weight of one fruit varies between 210–250 g, and subject to the recommended growing conditions, the wall thickness reaches 1.5 cm. The taste of the pulp is sweet, juicy, with a pronounced pungent aroma, and does not have bitterness characteristic of hybrids. The fruits are used raw and cooked.

Advantages and disadvantages of the variety
The variety is marked with a combination of F1, indicating hybridity.
- Popular due to several advantages:
- significant yield (up to 5 kg / m²);
- decorative appearance and excellent taste;
- friendly germination (up to 100%) and the simultaneous formation of the crop;
- the possibility of growing seedlings both in open ground and in greenhouses;
- unpretentiousness, simple adaptation to various environmental conditions;
- high safety of appearance and food characteristics during transportation;
- the ability to use both for cooking and for eating raw.
- The disadvantages of the hybrid:
- the need for frequent watering and top dressing;
- relatively long transition from the phase of technical ripeness to the final maturity of the fetus.
Grade Features
The hybrid was bred for cultivation in conditions of high illumination and warm climate, therefore, it has features of ripening and yield.
Did you know? The first written mention of sweet peppers dates back to the mid-15th century - Christopher Columbus's personal doctor, who appreciated the medicinal properties of peppers in the fight against scurvy, responded extremely positively.
Ripening time
On average, the growing season for Claudio pepper lasts from 70 to 80 days, but in the middle zone this period is extended to 90 and even 105 days. Acquisition of the right color by the fruit directly depends on the number of sunny days - the more there are, the sooner the pepper becomes suitable for collection.
Productivity
Initially, the hybrid was supposed to bear up to 12 fruits weighing 210–250 g on one bush, and also have a yield of 5 kg per 1 m². Plants grown in the middle and northern latitudes form 6–8 fruits on one shoot, therefore, their yield decreases to 3–3.5 kg per 1 m², respectively. Greenhouse cultivation allows for higher planting productivity.

Cultivating varieties
Before planting this vegetable crop, it is necessary to take into account the nuances of cultivation. The cultivation of Claudio pepper seedlings takes place in several stages, has the features of soil preparation and care.
Seed selection and processing
If you do not harvest your own seeds from previously grown fruits, then when choosing seeds in the store, focus on the producer. Acquire planting material exclusively from trusted companies; when purchasing, check the seed release date - they retain germination for no longer than one year. Do not hesitate to ask the seller for a product certificate, as its availability guarantees the quality of the seeds. Avoid buying seed from individuals - you run the risk of not getting the grade you are hoping for.
Did you know? On the European continent, sweet pepper came from South America. In the era of the discoveries of H. Columbus, conquistadors brought this amazing vegetable to Portugal, Spain, and from there it spread to other European countries.
In order for the seeds to sprout together and be resistant to diseases, they are treated in this way:
- Sprinkle the seeds on a blank sheet of paper and select among them those that seem too small or hollow.
- Disinfect to prevent possible infection of the plant with harmful bacteria or fungi. Prepare a three percent solution of potassium permanganate, wrap the seeds in gauze or cotton cloth and dip them in the solution for 20–25 minutes.
- Transfer the seeds to a shallow container with a cloth and place under running water to rinse with potassium permanganate.

It is believed that seed soaked in a nutrient solution has:
- high resistance to diseases;
- resistance to adverse conditions;
- better productivity.
Did you know? Sweet pepper is known as Bulgarian pepper, since it was in Bulgaria at the beginning of the 19th century that large-scale breeding work was carried out to develop large-fruited sweet pepper.
Preparing land for seedlings
The future harvest of pepper depends not only on the quality of seedlings, but also on the soil into which the seeds were sown. This can be either soil purchased in a specialized store or a self-prepared mixture. If you bought a ready-made soil for peppers, add clean river sand to it at the rate of 1 kg of sand per 5 kg of mixture, since store compositions often have high acidity.
So that the quality of the soil is high, focus on the following characteristics:
- Friability. The porous structure of the soil allows moisture and air to flow freely to the root system of the plant.
- The balance of mineral composition. In addition to organic substances, there should be micro- and macro-elements in the soil that contribute to the development of seedlings.
- Acidity. Since peppers are extremely sensitive to pH, it should be in the range of 6.5–7.
The composition of high-quality soil should include the following components:
- peat - retains the moisture necessary for plants, while preventing its accumulation;
- humus - increases the nutritional value of the soil due to the high content of minerals;
- baking powder - this category includes river sand, sawdust, which provide a loose, breathing soil structure;
- leaf earth is another structural component that improves the drainage properties of the mixture.

Mix the components on a spread plastic film by hand.
Recipes of mixtures suitable for seedlings of peppers are as follows:
- River sand, turf land, peat are mixed in equal proportions, then 30 g of potassium sulfate and superphosphate, 10 g of urea are added to them. The resulting mixture is poured with 10 liters of warm water and set aside to dry in a warm place.
- Humus, peat, turf land in equal proportions are mixed with 0.5 l of ash, 35 g of superphosphate.
Note that the soil must be decontaminated before use for seedlings.
Methods of disposal of soil from foreign seeds and microflora:
- steaming - long-term (at least 3 hours) exposure of the tank with soil to a steam bath;
- freezing - keeping the prepared soil mixture outdoors in the winter;
- calcination - roasting the soil on a baking sheet at a temperature of + 80 ° C for 30–40 minutes;
- disinfection - watering the soil with a weak solution of potassium permanganate or fungicide type "Fundazol".
Important! It is allowed to use leafy soil only after disinfection, since strains of microorganisms that adversely affect the root system of sweet pepper can live in it.
Seedling Care
From the moment of sowing until the first shoots are biting, the box with seedlings must be kept in a warm, lighted room, and the soil should be covered with plastic wrap to prevent moisture loss. The temperature of the soil before emergence should be at least + 25 ° C, 4 days after sowing, it is moistened from the spray gun. As soon as the first sprouts appear on the surface of the earth, the film is removed and the container with seedlings is transferred to the southern or eastern windowsill.
After friendly shoots are formed, the soil temperature is reduced to +20 ... + 22 ° C for 2-3 days, so that the young sprouts harden. The seed box is set in a well-lit place. So that the plants do not lean in different directions, the box is rotated 2-3 times daily and it is additionally illuminated with fluorescent lamps.

Pepper seedlings are fed to stimulate their growth and improve soil composition. It is carried out twice during the period of growing seedlings - the first time two weeks after the formation of 2-3 leaves, and the second 3-4 days before planting in open ground.
As a top dressing use:
- 0.5 kg of ash per 10 liters of water;
- 35 g of superphosphate and 5 g of urea per 10 l of water.
Important! If the maximum yield is not your goal, you can remove the bushes from the ground along with the rhizomes and hang them with the fruits down in the store - this method extends the shelf life of sweet peppers for another month .
At the early stages of plant development, it is not recommended to fertilize them, since a sufficient amount of nutrients for 1.5–2 weeks of development is contained in pepper cotyledons and soil. The air temperature at the time of cultivation should be + 22 ... + 25 ° C during the day and + 14 ... + 16 ° C during the night. If the day turned out to be cloudy, the air temperature is reduced to + 20 ... + 22 ° С.
Remember the recommended hardening procedure, which strengthens the plants and increases their productivity. Hardening begins with a short-term (up to 30 minutes) exposure of the boxes with seedlings on the balcony to a temperature of about + 15 ° C. Then, the indicated period is gradually (by 15 minutes daily) increased to 5-6 hours until the day of transplanting seedlings into open soil.
Transplanting seedlings into the ground
Since the root system of peppers is fragile and weak, they do not tolerate transplanting - it will be better if you transplant them in open soil together with peat pots or tablets in which they grew. By the time of planting, each stem should have within 8-12 true leaves and the beginnings of the first flower buds. Since the optimum air temperature for peppers is considered to be + 17 ° C, it is recommended to land in late May or early June, when the risk of night frost is excluded.

Please note that pepper will yield a low yield when planting in the area on which such crops grew:
- potatoes;
- Tomatoes
- eggplant;
- physalis;
- tobacco;
- Bell pepper.
Good predecessors and neighbors for sweet peppers will be:
- roots;
- legumes;
- pumpkin;
- greenery;
- White cabbage;
- cucumbers.
The selected area should be well lit, protected from drafts and cleaned of foreign plants. The soil requirements are also quite serious - it should be warm, loose and well-drained. On clay and loamy soils, sweet pepper does not grow, you can fix this substrate by adding peat, humus and river sand at the rate of 1 bucket of each component per 1 m² of area.
Important! If the bushes have grown small, it is allowed to plant two plants in one well at once - so they will be more resistant to the negative effects of environmental factors and better keep the fruits on the stems.
If the soil is excessively peaty, 1 additional bucket of soddy soil and humus must be added per 1 m². It is difficult to enrich the sandy land - it is necessary to add 2 buckets of clay soil, peat, humus and steamed sawdust (1 bucket) per 1 m² into it. To minimize stress for plants, it is necessary to transfer them to the open ground in the first half of a cloudy cool day or on a sunny evening.
The planting scheme for Claudio pepper provides a distance of 60 cm between the beds and 40-50 cm - between the bushes. It is also possible to plant in a square-nesting way, in which plants are planted on the tops of a square with a side of 50 cm.

Pepper care after planting in the ground
After transplanting seedlings into the ground, it takes time to adapt to new conditions. Usually this period takes 10-12 days, during which the plants look sluggish and grow slowly.
Watering and feeding
Watering the pores first after planting is recommended to be reduced to a portion of 0.2 l for each plant, and water them as the soil dries. The first real irrigation irrigation is allowed no earlier than a week after planting. Before the flowering period, plants are watered once a week with 10 liters of water for every 1 m² of soil.
During flowering and fruiting, irrigation should be changed to basal irrigation and increase the portion to 14 liters per 1 m². The water temperature should be in the range + 23 ... + 25 ° С, since the influx of cold water to the roots slows down the fruiting and delays the ripening time.
Learn more about how to properly water pepper in a greenhouse.
Plant nutrition increases the expected yield due to the fact that it stimulates photosynthesis and strengthening of the root system. It is necessary to top-up every two weeks, and a few days before it - to water the bushes so that the nutrients are more evenly distributed in moist soil.
Alternate solutions of organic fertilizers such as manure, droppings, and mineral store mixes. At the beginning of the formation of the ovaries and in the last stages of fruit ripening, it is recommended to spray the bushes with sodium humate. Also use sprinkling of beds with ash at the rate of 1 tbsp. ash per 1 m² of soil.

Hilling, loosening and mulching of soil
To speed up the engraftment, you should loosen the soil around the root neck of the bushes by 3-5 cm and spud them - this will improve the flow of air to the root system. After each irrigation and heavy rain, the soil must also be loosened so that it does not become crusted. Loosen as soon as the soil dries enough so that it does not stick to the tools.
We recommend that you learn about such varieties of sweet peppers as: Golden Miracle, Gypsy, Winnie the Pooh, Tusk, White Gold, Kubyshka and Flying.
Simultaneously with loosening, remove weeds grown on it from the soil that interfere with the development of crop crops. As the pepper grows, increase the earthing depth from the initial 5 cm to 10 cm during flowering and 12–15 cm during ripening of fruits.

Bush formation
In the formation and tying bushes hybrid Claudio F1 practically do not need. If the site is small and you want to form compact bushes, wait until the plant is 25-30 cm long and pinch off the top of the central stem. The bush will begin to branch and form "stepsons". Of these, leave 5-6 of the strongest shoots on which the fruits will be tied. Keep in mind that the first pepper from the bush must be removed as an ovary - this will significantly increase productivity.
You will be interested to know if you need to pinch bell pepper.
Diseases and Pests
When growing sweet pepper, special attention should be paid to preventive measures aimed at combating pests and extraneous soil microflora.
Common “enemies” of a gardener growing sweet peppers are:
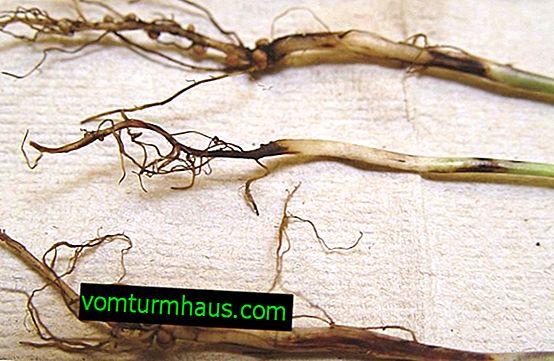
- Blackleg. This fungal disease occurs at the stage of formation of true shoots, the cause of its appearance is the infection of the soil, seed material. A bush infected with a black leg begins to dry out, its stems darken at the bottom. To get rid of this disease, the affected beds must be carefully shed with a weak solution of potassium permanganate.
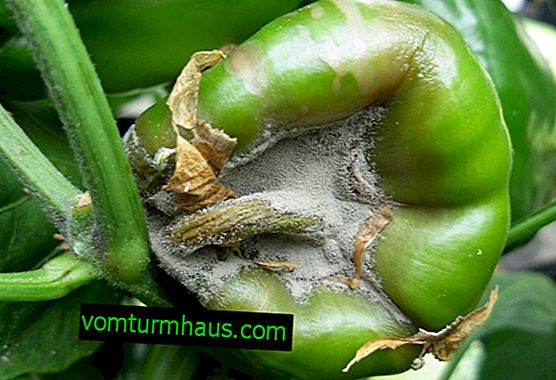
- Gray rot. It occurs in the form of wet brown spots covered with a gray coating. Heavily affected plants must be destroyed, and the rest of the beds treated with drugs such as "Fundazol", "Previkur."
- Late blight. It is represented by dry brown spots that spread over foliage and fruits. The higher the air humidity, the faster the pathogen spreads, therefore it is recommended to spray the plants with Gamair or Fitosporin-M substances.

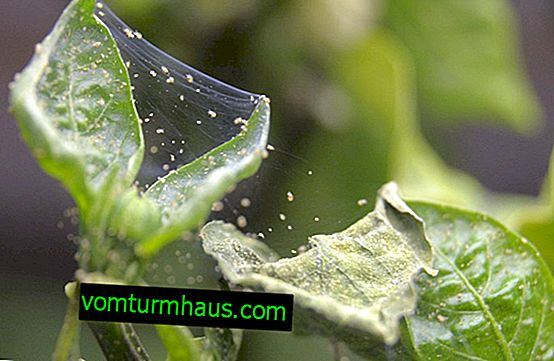
- Spider mite. It is not immediately detected by gardeners, as it settles on the bottom of the leaves. To remove this type of pests, you need to mix 1 tbsp. chopped onions, 1 tbsp. dandelion leaves and 1 tbsp. l мыла, а затем добавить полученную смесь в 10 л тёплой воды, настоять их в течение 5 часов и обработать грядку.
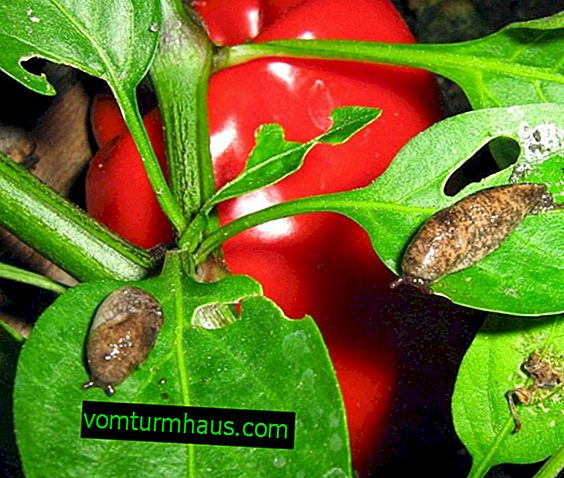
- Голые слизни. Питаются как листовой зеленью, так и плодами, поэтому их необходимо собрать с грядки, а затем обработать растения и почву препаратом «Стрела».


Harvesting and storage of crops
Время уборки перца Клаудио наступает примерно через 80 дней после высадки в открытый грунт. К этому времени перцы не только достигают необходимых размеров, но и приобретают насыщенный красный оттенок. Если вы планируете хранить плоды в течение длительного времени, то вам понадобится собрать их на стадии технической спелости, когда размеры полноценного овоща уже достигнуты, а цвет всё ещё остаётся тёмно-зелёным.
Урожайность куста будет максимальной, если снимать перцы по мере их созревания — не реже одного раза в неделю. Помните, что пользу можно получить только от биологически спелого плода, правда, сроки его хранения минимальны. Чтобы не повредить плоды и растения, снимайте перцы при помощи секатора, аккуратно отрезая их от стебля вместе с плодоножкой.
Советуем вам узнать, о таких сортах перца, как: Биг Бой, Буратино, Биг Папа, Золотой телец, Бугай и Гогошары.
Чтобы снятые плоды хорошо хранились, придерживайтесь таких советов:
- Отсортируйте собранные плоды. Уберите из общей массы те, на которых имеются следи цветения или гнили.
- Если урожай собран незрелым, поместите его в затенённое помещение. При температуре +10…+12°С он дозреет примерно за 1, 5 месяца, а храниться будет до 5 месяцев.
- Биологически зрелые плоды хранятся при температуре 0…+2°С в течение двух месяцев, влажность при этом должна быть в пределах 80%.
- Закладывать перцы на хранение необходимо в небольшие ящики, выстеленные пергаментной бумагой. Сохранность плодов будет выше, если каждый из них обернуть бумагой по отдельности.
Сладкий перец сорта Клаудио получил признание у многих овощеводов-любителей за высокие вкусовые и урожайные качества. Чтобы получить максимальную продуктивность от растений, придерживайтесь правил посадки и ухода за ними, тогда растения отблагодарят вас обильным урожаем.


