Choosing a place to install a greenhouse on the site
The dream of any gardener is to have a greenhouse on the plot in order to provide himself with fresh vegetables or to make money by selling off-season fruits and herbs. If you decide to buy a finished construction and want to equip the greenhouse yourself, follow the instructions given in the article and get a quality construction, saving on assembly and construction.
Choosing a place for a greenhouse on a site
To grow a good crop in a greenhouse, you must first choose the right place for its equipment.
Rules for the successful location of the greenhouse:
- trees and shrubs on the site should protect from drafts and winds;
- the surrounding buildings should not interfere with the development of plants - the distance to the nearest buildings should be about 3 m;
- long walls are located in the east-west direction for maximum sun exposure of plants in the greenhouse, and short walls are south-north;
- trees and shrubs on the site should not shade, and the root system to take moisture from plants in the greenhouse;
- The approach to the construction should be convenient.
Did you know? Today, the largest greenhouse construction, covering an area of 121 hectares, is located in the UK - Kew Royal Botanic Gardens.
Preparation of the site for the installation of the greenhouse
The best time for the installation of the greenhouse is autumn, when the plants stopped bearing fruit and the crop was harvested. At this time, nothing will prevent you from choosing a site for installation and free space for installation. Winters the building without damage, since polycarbonate is not affected by low temperatures.

Site preparation begins with marking and stripping. The installation area must be marked with pegs, remove the topsoil, brushing from roots and large stones. Tamp the freed-up place and level it by applying the building level.
Self-installation of a polycarbonate greenhouse
For the assembly you will need an assistant, since it is impossible to fix and maintain the structure alone. Stock up on the necessary tools (screwdriver, wrenches, knife, level, square). Did you know? Most greenhouses are in Holland. They occupy 10, 500 ha, which is a fourth of the entire country.
Design selection
When choosing a design, one should take into account temperature fluctuations in the region and wind loads, take into account the stability of the structure. You should not choose a large greenhouse, if you are not going to use the entire area - a smaller area is easier and easier to heat.
The most common and convenient designs are:
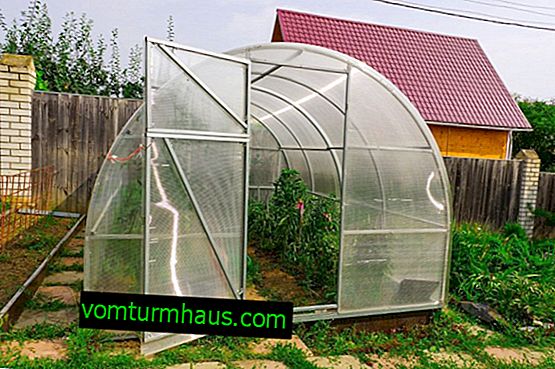
- Arched . Easy to assemble and affordable. It is easy to lengthen the room by adding additional sections. Have a smaller reflective surface. They allow the use of highly growing plants, but leaving the walls is difficult. In winter, it is possible to bend and break the roof from snow. Instability in strong winds.
- Slippery . Suitable for small areas. Economical. The design is convenient to operate.

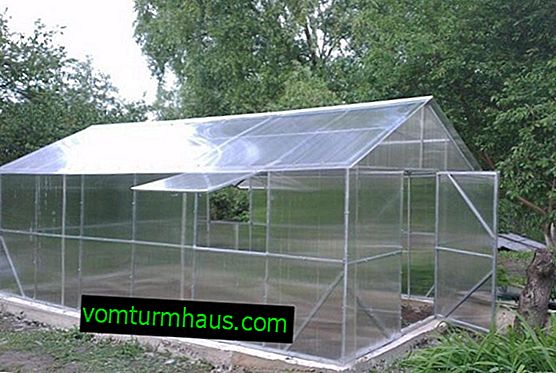
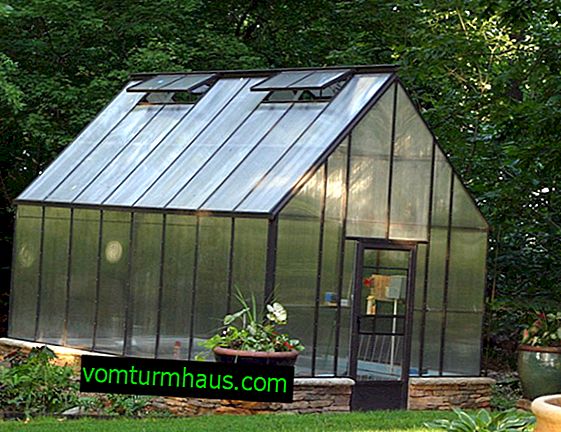
- Gable . The familiar form in the form of a "house". Withstand a large amount of snow. They have a large reflective surface, which reduces the light inside.
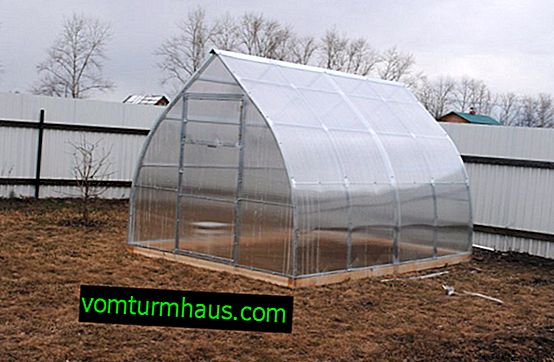
- Teardrop-shaped . Snow does not snow due to the sloping roof. Good light inside. Soil warming in the spring. The complexity of constructing the structure.
- Polygonal (quite rare). Provide good lighting. Large usable area. Resistant, protect plants from overheating. Cost effective.


Foundation preparation
Many people believe that the foundation is necessary for capital structures, and the lightweight construction of the greenhouse can be placed directly on the ground. This decision is justified by the mobility of the greenhouse, free movement on the site.
But the stationary base, in turn, provides strength and stability, and is necessary in the following cases:
- the wind rose in this area creates a sail - the structure can be disrupted by the wind;
- large sizes of the greenhouse - lead to deformation and subsidence;
- the greenhouse is used all year without interrupting the growing process;
- placing the structure above ground level, it is possible to save up to 10% of heat;
- adverse climatic conditions and external influences - protection against freezing, ingress of moisture, cold air, rodents and pests.
Check out the features of choosing the foundation for the greenhouse.
Polycarbonate greenhouses, require a rigid base. By choosing simple types of foundation for erection, you can cope with their construction even with minimal construction skills.
Spot
The simple construction of the point foundation allows you to install the greenhouse horizontally on supports made of wood, brick, concrete or foam concrete blocks or posts. The larger the structure, the more durable material for backwater you need to choose. This type of foundation is suitable for temporary and light greenhouses.

For a medium-sized structure, 6-8 reference points will be needed:
- Mark up the size of the frame.
- Support columns are placed in the corners (they are dug into a level with soil).
- Evenly arrange and dig in the remaining columns a meter apart.
- Fill a corner for subsequent mounting of the frame.
When supporting the columnar structure, roofing material can be used as a formwork for pouring pillars. Such a foundation is reliable, durable and inexpensive, but additional work is needed to warm the base and tighten the harness.
Tape
It is used for stationary heavy greenhouses of large sizes and is a masonry laid in the soil around the perimeter from the following materials:
- concrete - in a shallow trench along the perimeter of the base of the greenhouse, formwork is installed and poured with concrete or butobeton;
- brick or blocks - such materials can be installed on a sandy base, fixed with a cement mortar;
- wooden beam or sleepers - the material is knocked down and fastened into a frame, and installed on roofing felt or roofing to provide waterproofing. Railway sleepers are treated with anti-decay compounds, but the timber will have to be processed.

The procedure for the construction of the strip foundation is as follows:
- Marking and digging trenches.
- Preparation of the base (sand, gravel, roofing material).
- Formwork installation, reinforcement and concrete pouring (for concrete foundation).
- The ultimate waterproofing.
From timber
The basis for the greenhouse is a frame of wooden beams of suitable section. It is easy to fasten any frame to the tree and change the position of the greenhouse for future use. For greater reliability in the corners, you can install additional posts when attaching the base of the greenhouse.
Important! Any wood requires treatment with antiseptics and impregnations to protect against moisture and decay.
Procedure:
- Marking the area under the foundation.
- Digging a trench, the depth and width of which depends on the cross-section of the beam (for example, at a cross-section of 10 × 10 cm - a depth of 15 cm, a width of 80 cm more than the thickness of the beam).
- Lap laying of roofing material or roofing for waterproofing.
- Laying the beam on the base and fixing the frame with corners.
- Leveling (correct minor deviations by adding sand or gravel).
- Pros:
- high-quality thermal insulation;
- low cost;
- simplicity of installation and operation;

- Minuses:
- low strength;
- short term of operation;
- the need for impregnation.
From blocks
Whatever type of blocks you choose, they all fit into the foundation with a tape method:
- At the bottom of the trench sand is poured, wetted and rammed.
- The first row of blocks is laid on a cement mortar.
- In the corners lay out 2-3 blocks in height, strictly observing the verticality.
- Pull the cord between the corner blocks for horizontal level.
- The blocks are fastened with a solution and so fill all subsequent rows.
Important! When installing any foundation, it is necessary to install anchors (bolts, fittings, angles or metal plates), with their help the greenhouse is attached to the foundation.
- Pros:
- good waterproofing;
- durability;
- favorable cost.

- Minuses:
- low thermal insulation;
- weak strength.
Concrete
This type of foundation is used under such conditions:
- proximity to groundwater;
- installation of a greenhouse on a slope;
- deepening the greenhouse into the ground.
Did you know? Icelandic geysers are used for greenhouses. This provides tremendous savings on heating.
The sequence of work:
- The trench under the foundation is first covered with sand, then with gravel and compacted to ground level.
- Install formwork over gravel.
- Distribute the reinforcement, fastening it with wire.
- Pour with concrete mortar, compacting it and not forgetting to install anchors.
Greenhouse without foundation
The lightness of the frame and plastic of the polycarbonate greenhouse allows you to do without a support base, but the question arises about the reliable attachment of the structure to the soil to avoid overturning in the wind. Such a greenhouse installation is only possible with seasonal use.

To install the structure on the ground, soil lugs (T-shaped posts), which should be included in the kit with the greenhouse, are dug into the soil to a depth of 30 cm. This reduces windage and creates relative stability.
- Cons of installing a greenhouse without a foundation:
- heat loss (up to 10%);
- poor protection against freezing through the ground;
- penetration of weeds, rodents and pests;
- destruction of polycarbonate sheets in contact with the ground;
- land shrinkage can cause skew.
Read also how to choose or make a polycarbonate greenhouse with your own hands.
- Advantages of installation on the ground:
- simplicity and speed of installation;
- profitability;
- ease of dismantling after seasonal work;
- free movement around the site.
Wireframe selection
The frame is the skeleton of the greenhouse, and it must be strong, reliable and durable.
When choosing in favor of a specific material for the frame, you need to remember about the requirements for the structure as a whole:
- ease of installation of a translucent coating;
- recreation of the selected form;
- sustainability;
- ensuring rigidity of the entire structure;
- resistance to temperature differences inside and outside the room.
Wooden
Wood is a traditional, affordable and inexpensive (compared to others) building material for greenhouses. The construction and operation of wooden frames has pros and cons.

- Pros:
- ease of installation;
- cost-effectiveness of consumables;
- environmental friendliness of the material;
- any materials are easily attached to a wooden frame;
- good thermal insulation.
Learn how to build a greenhouse out of wood with your own hands.
- Minuses:
- the fragility of the structure without appropriate impregnation;
- antifungal treatment needed;
- insufficiently elastic material for creating, for example, arched structures.
From metal profile
Greenhouses with a metal frame are considered more reliable and durable. In this case, profile pipes, aluminum and galvanized steel should be used in the frame. The coating should be galvanized on both sides, this is the only way to protect the structure from rust, which will certainly happen with polymer-powder or primed coatings, which are not able to withstand the aggressive climate of the greenhouse for metal. For frames, a U-shaped profile (cross section 50 × 40 mm) is suitable, arcs can be made from a rack profile, and horizontal parts from a guide.

For the manufacture of frame arcs, you can use ordinary square profile pipes with a cross section of at least 20 × 20 × 1.5 mm (bend with a pipe bender), and the racks from the rack profile (50 × 50 × 3 mm). The pipe has good rigidity, condensation does not linger on it, care is only in timely painting. To reduce thermal conductivity, you should choose light tones. Arc from pipes is cost-effective, but in winter you will have to clear the roof of snow to avoid deflection.
The aluminum profile is durable, lightweight, durable and does not require painting, but it is expensive and difficult for self-welding. When fastening the aluminum frame with bolts, the strength and reliability of the structure is reduced.
The galvanized profile is easy to use, not susceptible to corrosion and allows you to create a design of any shape (arched, single and gable). When working with a galvanized profile, you need to be careful not to cut yourself with sharp joints.
You will be interested to read how to build a greenhouse out of plastic pipes.
The number of transverse fasteners - arcs affects the strength, stiffness, snow and wind resistance of the structure. For the strongest, the distance between the arcs is 0.5 m. The location of the arcs in increments of 0.67–1 m is considered optimal, depending on the characteristics of the profile. For steps over 1 m, the thickest polycarbonate and profile must be used.
Polycarbonate lining
More often, the skin of the frame is carried out with cellular polycarbonate, which has successfully replaced glass and film. Polycarbonate is stronger than glass and is not inferior to it in light conduction (86%), surpasses in thermal insulation properties, strength, flexibility and lightness. Polycarbonate is resistant to natural factors and withstands temperature fluctuations (–40 ° С ... + 120 ° С). A special protective layer prevents the penetration of ultraviolet rays into the room.

Polycarbonate sheathing is the most important moment of the installation of the greenhouse and requires careful observance of the rules:
- mounting holes should be slightly larger than the diameter of the screws (this will avoid damage during thermal expansion);
- a long sheet of polycarbonate should be fixed with screws in the oval mounting holes, installing the screw in the center;
- self-tapping screws should be at least 5 mm in diameter with rubber washers to reduce heat loss through the joints;
- before the lining starts, the inner film is removed from the polycarbonate sheet, the outer one - after the end of work;
- the sheet must be placed strictly vertically, so that condensate from the internal cells flows freely from the voids;
- fastening is carried out at 3.5 cm from the edge of the sheet;
- the step of fixing with screws depends on the thickness of the sheet and is 30–40 cm (thickness 6–8 mm), 50 cm (thickness 10 mm);
- it is necessary to control the efforts when screwing the screws in order to avoid damage to the sheet.
Important! When polycarbonate sheathing, the sheet must be secured with a protective layer to the outside, and not otherwise. Polycarbonate sheathing starts from the end walls, the sheets are installed with an inlet and screwed. Surpluses are cut with a knife on the frame, doors and windows are cut out through the openings. Then, the skin of the side walls and the roof is produced. With the arched form of the greenhouse, the sheet is thrown from the base of one side to the other, leveled and fixed to the frame. Subsequent sheets are wound with an overlap (5-10 cm) in the absence of special joints. Remove the outer film - and the greenhouse is ready for use.
Arrangement of the greenhouse
To get good harvests, it’s important not only the choice of the design of the greenhouse, but its arrangement inside - the location of beds, paths, shelves and shelving. A relatively small space of the erected greenhouse must be used with the maximum benefit for caring for plants and for creating a microclimate - a combination of lighting, humidity, heat and ventilation.

The layout of the beds depends on the vegetable growing crops and the size of the greenhouse:
- three beds - two passes, the middle bed (90-120 cm) wider than the side;
- two wide beds on the sides - one passage, plants with this arrangement receive maximum sunlight;
- three narrow beds - two wide aisles;
- a wide bed in the middle - two narrow side, the scheme is appropriate for wide greenhouses.
The beds form a height of about 30-60 cm and are located in the west-east direction, low-growing plants are planted on the south side. Leave free space at the entrance, making the central bed shorter. Paths between beds should provide a free approach to plants. With narrow paths, plants are located close to each other, which reduces the illumination and ventilation of the plantings. Wide tracks - unreasonable use of usable area.
The optimal width of the paths is 45–70 cm. The paths can be laid out with stone, gravel, brick, paving slabs, roofing material over the boards. Internal racks are used for potted plants, containers with seedlings, household equipment. The width of the shelves is approximately 90 cm, and the height is selected based on ease of use.
Polycarbonate greenhouses in the summer are heated by natural sunlight, and in the winter months, heating can be done with heaters or stove heating. To ensure ventilation in the summer, the windows of the greenhouse can be kept open all day. Using a thermal drive will automatically adjust the temperature and humidity.

In early spring or autumn, when there are no plants in the room, and the temperature does not drop below zero, it is necessary to carry out work to eliminate malfunctions, damage and sanitize the structure:
- washing for disinfection and cleaning of dirt by the pressure of plain water from a hose;
- checking stability and, if necessary, strengthening the frame and base;
- updating the protective layer of the frame;
- inspection and replacement as necessary of polycarbonate;
- elimination of cracks and punctures;
- preparation of the greenhouse for winter; for arched structures, supports are installed to protect against deflection under the weight of snow (10 cm of snow already poses a threat to strength).
The implementation of these recommendations will significantly extend the life of the structure. With good and careful care, the greenhouse will stand for 15 years, delighting the owner with high yields. Important! Washing is carried out in calm weather to prevent dust from settling on a damp surface. Нельзя использовать абразивные материалы и щётки, чтобы не нарушить защитный слой от ультрафиолета. Вам необходима теплица их поликарбоната, если: вы готовы проводить всё свободное время на огороде зимой и летом, радовать близких собственным урожаем без химии, цените свой труд и хотите защитить урожай от воздействия окружающей среды. Успех задуманного будет зависеть от выбора правильного места для сооружения теплицы.


